SmartBill Configuration
Complete guide for configuring the SmartBill integration with Shopify.
Before You Begin
Make sure you have an active SmartBill account with your login credentials at hand. Upon installation, you automatically receive a 30-day free trial with access to all features. After the trial period expires, select a plan from the Subscriptions page.

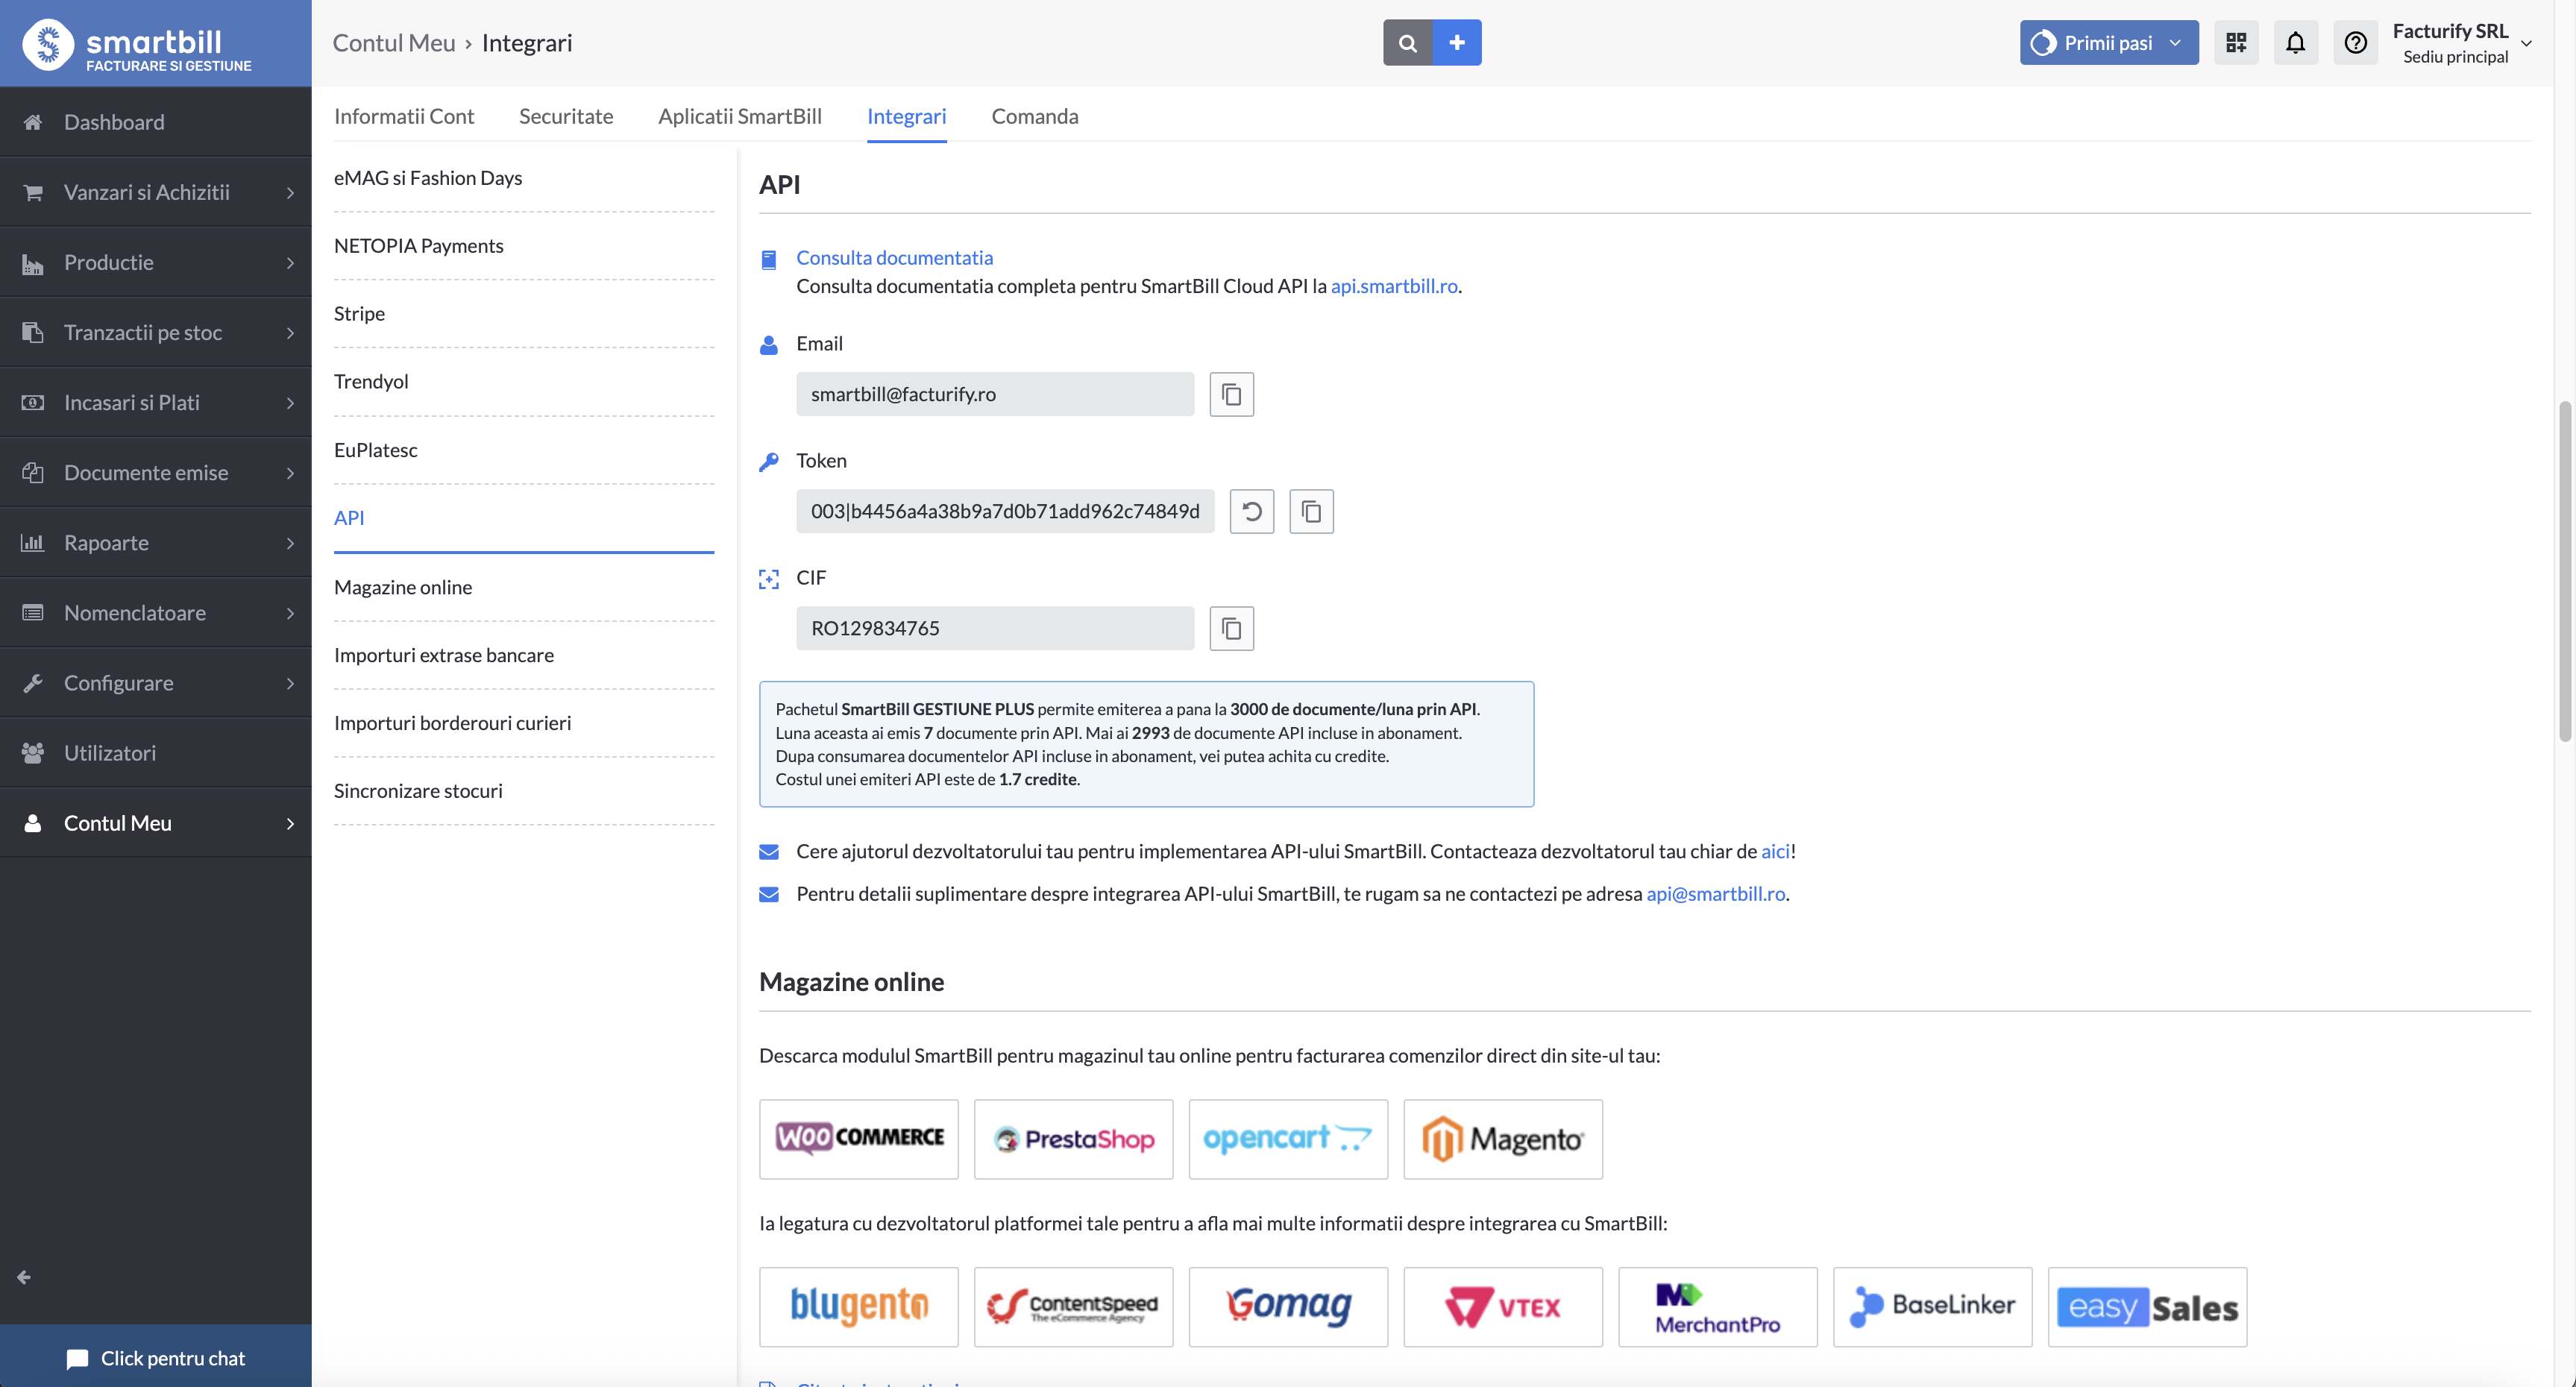
How do I get my login credentials?
- Go to SmartBill.ro — Log in to your SmartBill account
- Navigate to My Account → Integrations — Go to the API section
- Copy the credentials — Copy the data (Email, Token, CIF) into the SmartBill app for Shopify
Setup Wizard
When you first install the application, you will be guided through a step-by-step setup wizard. It helps you configure everything needed to start generating invoices.
Quick Setup
The setup wizard appears automatically on first access. You can complete the setup in a few minutes by following the steps below. After completion, you can modify any settings at any time from the Settings page.
Connect SmartBill
Enter your email, API token, and company CIF. The application automatically tests the connection and synchronizes data from SmartBill (series, VAT rates, warehouses).
Invoice Configuration
Select the invoice series, default VAT rate, unit of measure, and product code source (SKU or Barcode).
Warehouse and Stock
Select the default warehouse and enable stock management if you want automatic stock deduction when invoices are generated. Optional: enable multi-warehouse invoicing.
EU VAT and Export plan dependent
Configure the VAT regime (HOME or OSS) and export settings if you sell outside the EU. This step only appears if your plan includes these features.
Automation plan dependent
Enable automatic invoice generation when orders are placed. Choose which payment methods (card, cash on delivery, bank transfer) trigger automatic generation.
Completion
Configuration is complete! You will be redirected to the main page of the application where you can generate invoices or access advanced settings.
After Completion
All settings configured in the wizard can be modified later from the Settings page. The sections below describe each available option in detail.
Manual Settings
After the initial setup through the wizard, you can individually modify each setting from the Settings page of the application. Below you will find a detailed description of each option.
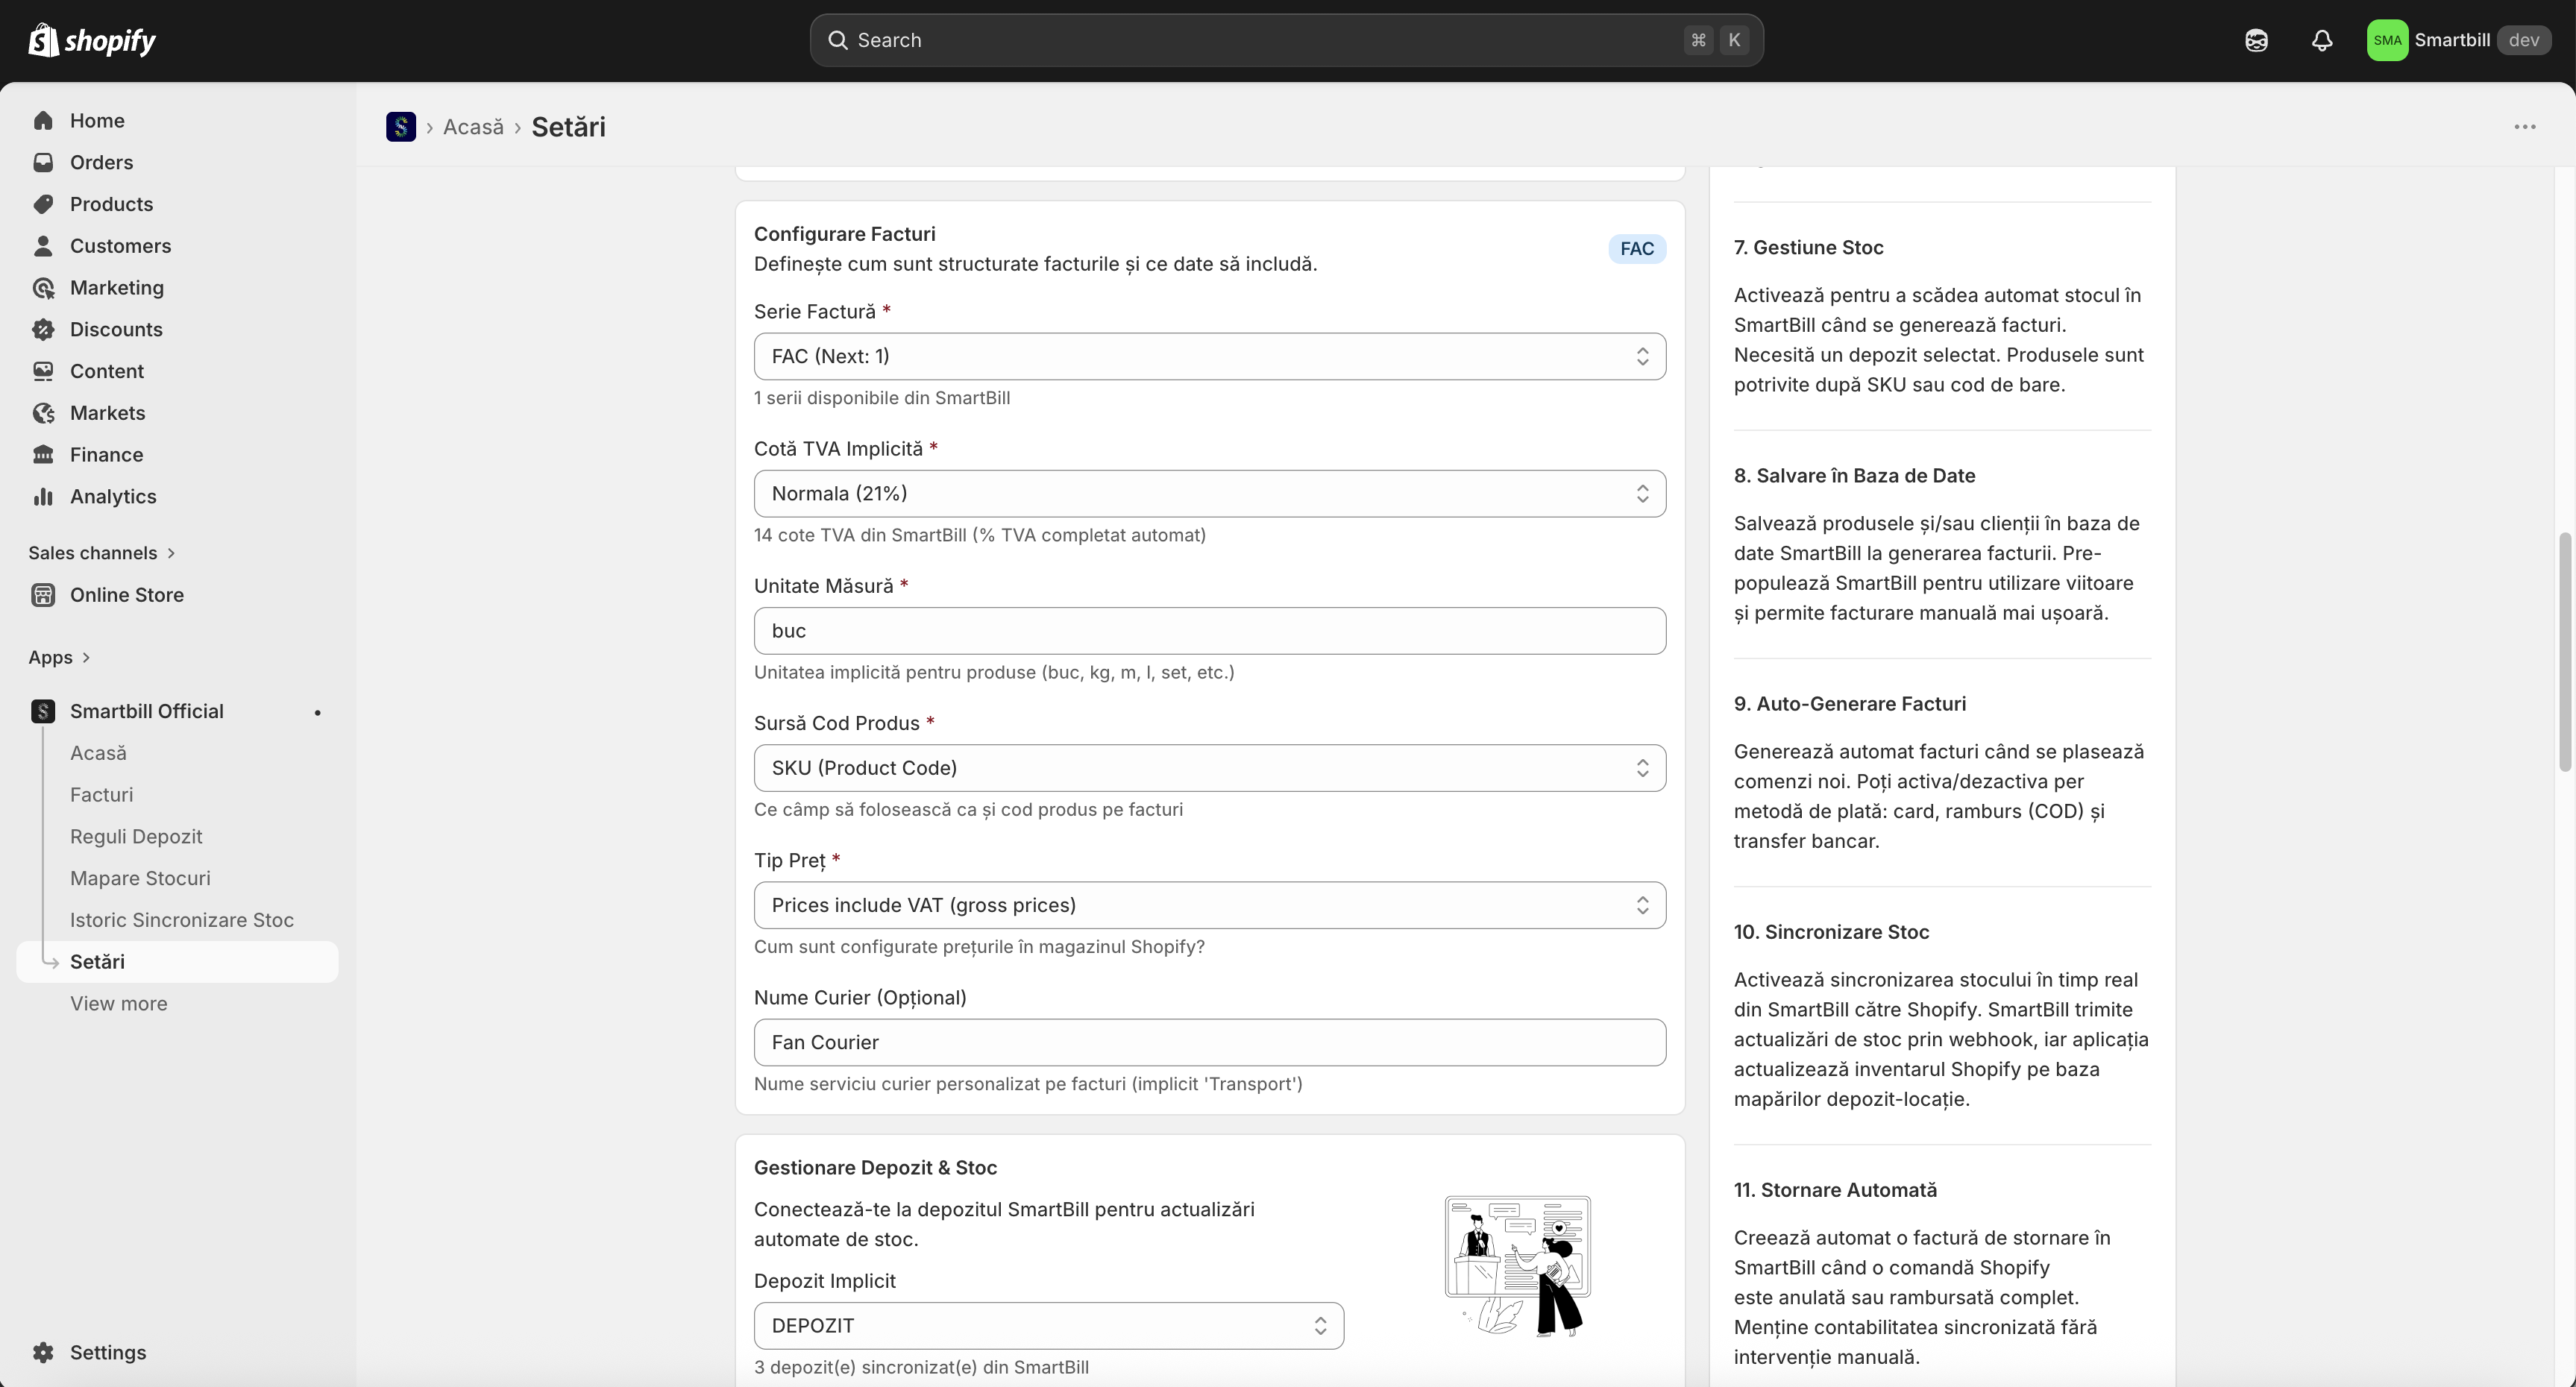
Invoice Configuration
Configure the basic parameters for invoice generation:
Invoice Series
Select the default series for invoices (automatically synchronized from SmartBill after connecting).
Example: FACT, INVOICE, etc.
Default VAT Rate
Select the VAT rate applied by default to products (only for VAT-registered businesses).
Standard (21%), Reduced1 (9%), Reduced2 (5%), Exempt (0%).
Unit of Measure
The default unit of measure for products on the invoice.
Default value: buc (pieces).
Product Code Source
Choose whether the product code on the invoice comes from SKU or Barcode.
Recommended: SKU for consistency with Shopify inventory.
Prices Include VAT
Specifies whether the prices from Shopify include VAT or not.
Courier Name (optional)
The courier name to display on the invoice (e.g.: Fan Courier, DHL, Cargus).
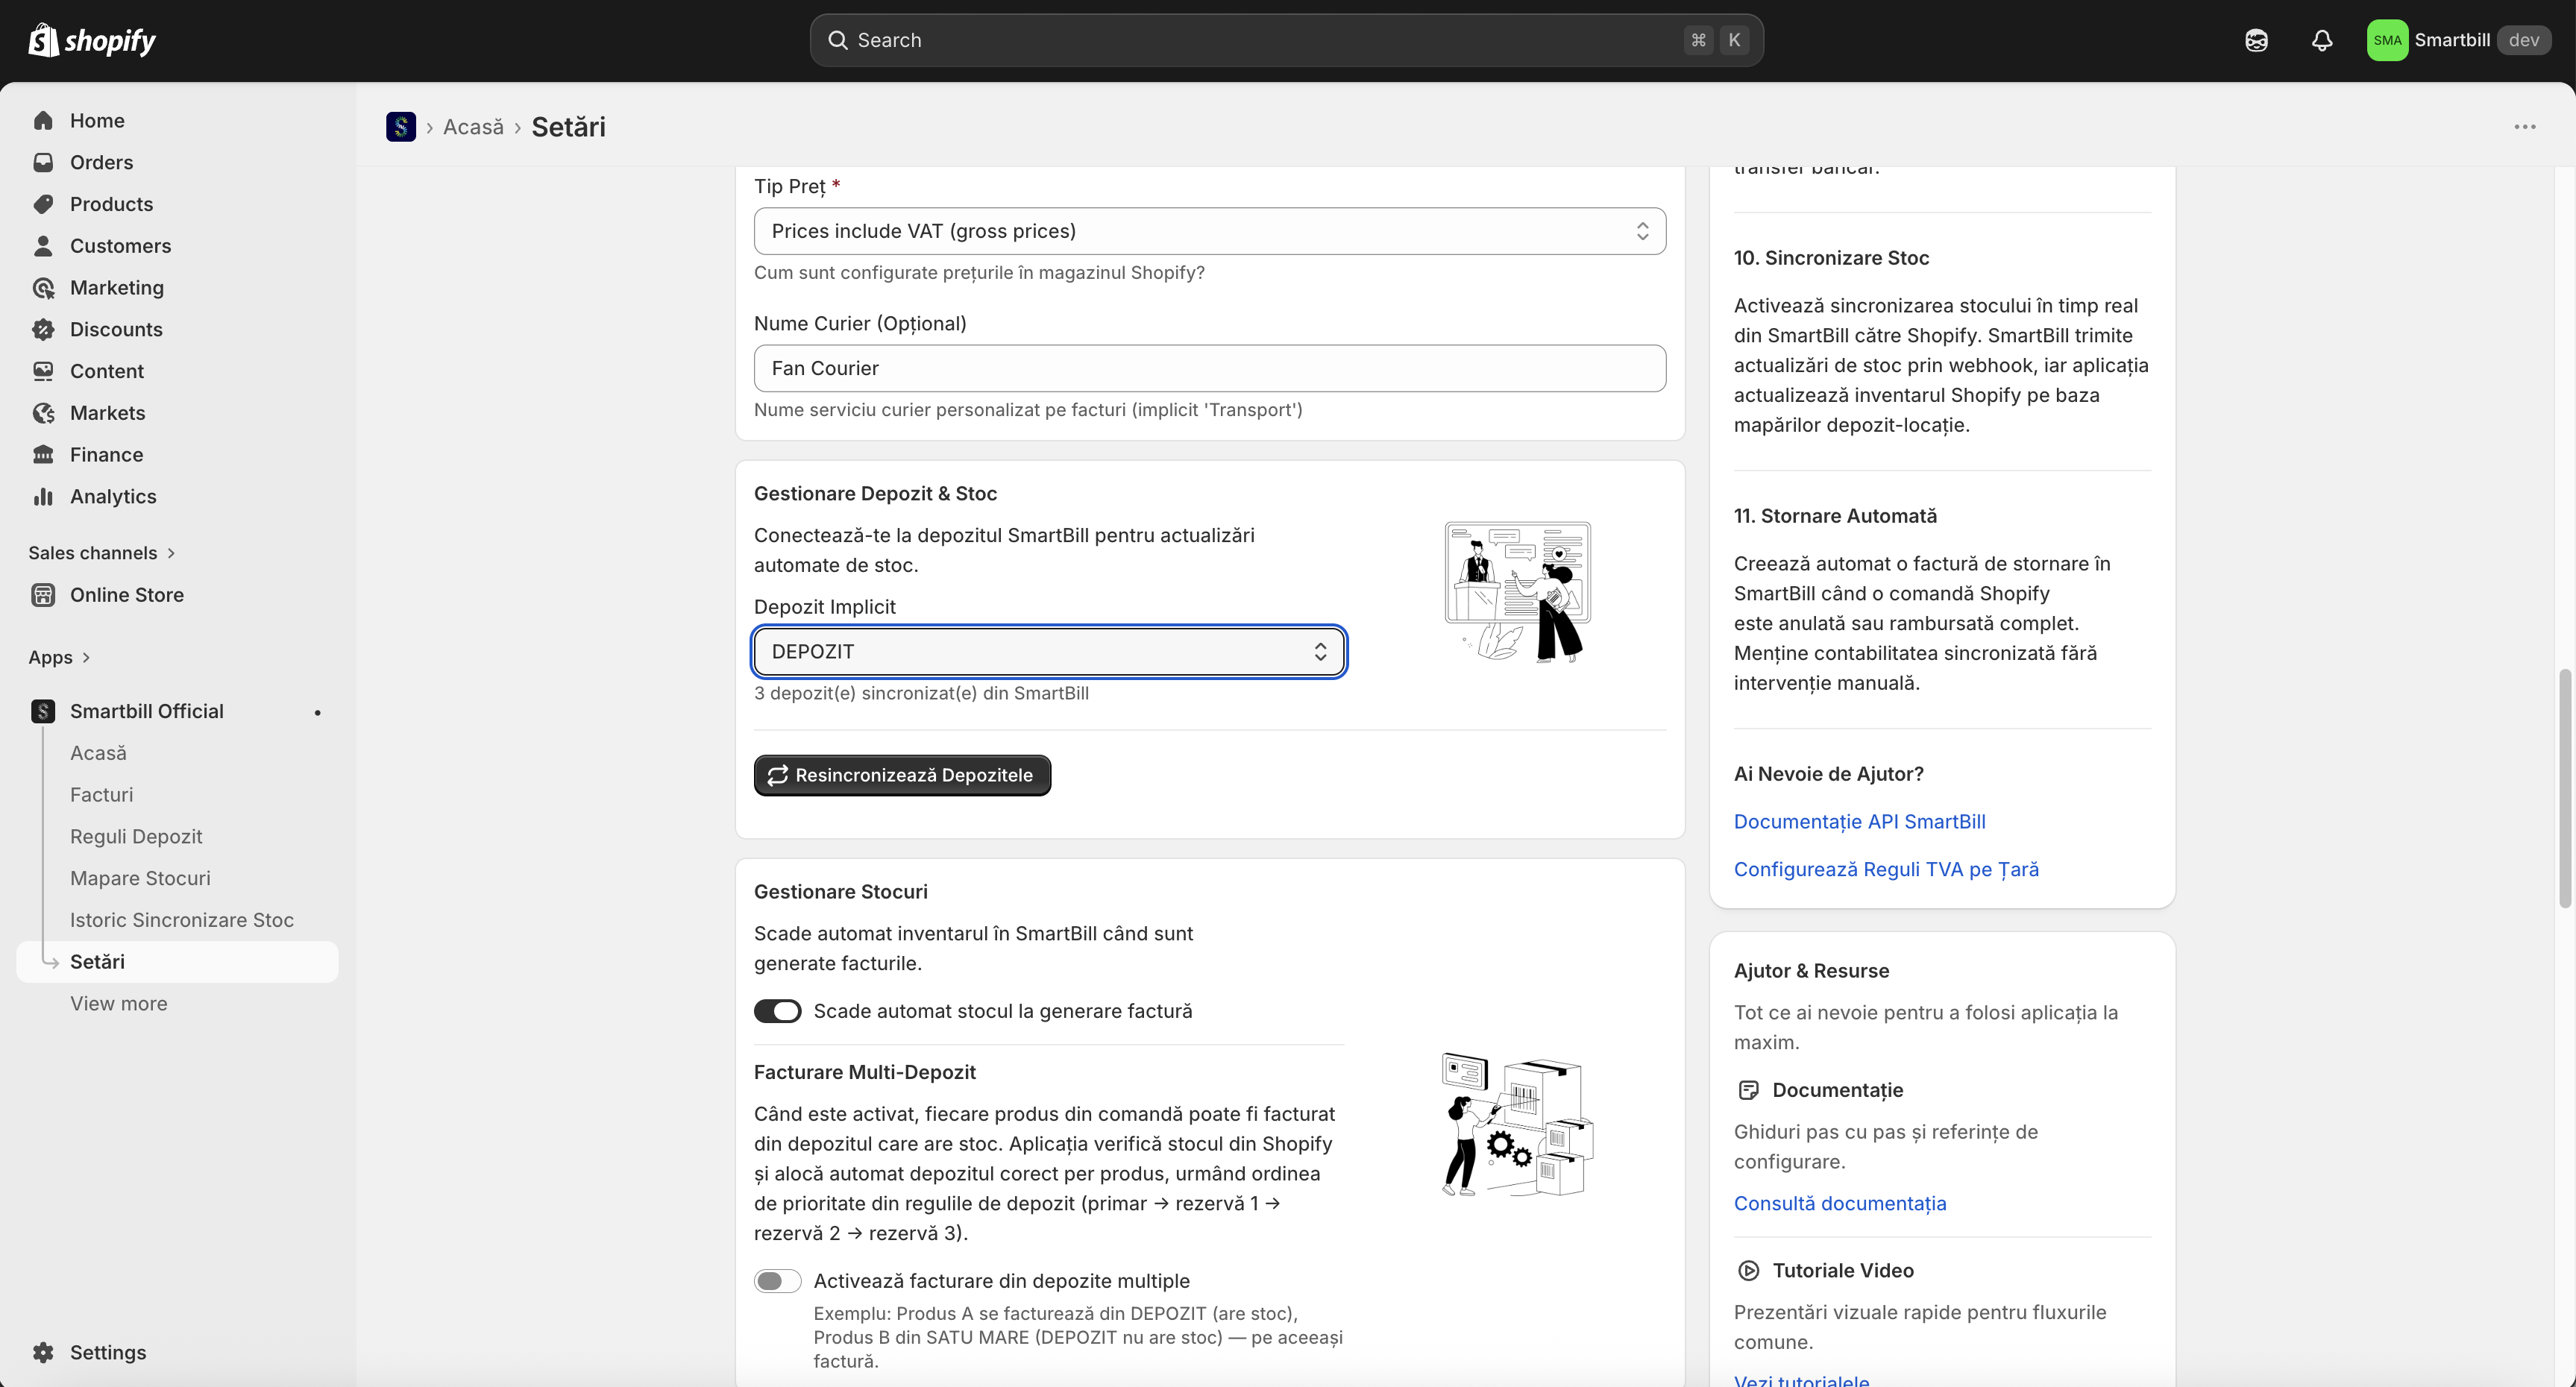
Warehouse Settings
Select the default warehouse for stock deduction when generating invoices:
Warehouse Configuration:
- Warehouses are automatically synchronized from SmartBill after connecting
- Select the default warehouse used for invoice generation
- For advanced rules, see Warehouses and Rules
Note
If you have multiple warehouses, you can create automatic rules based on country or region for intelligent routing.
Stock Management
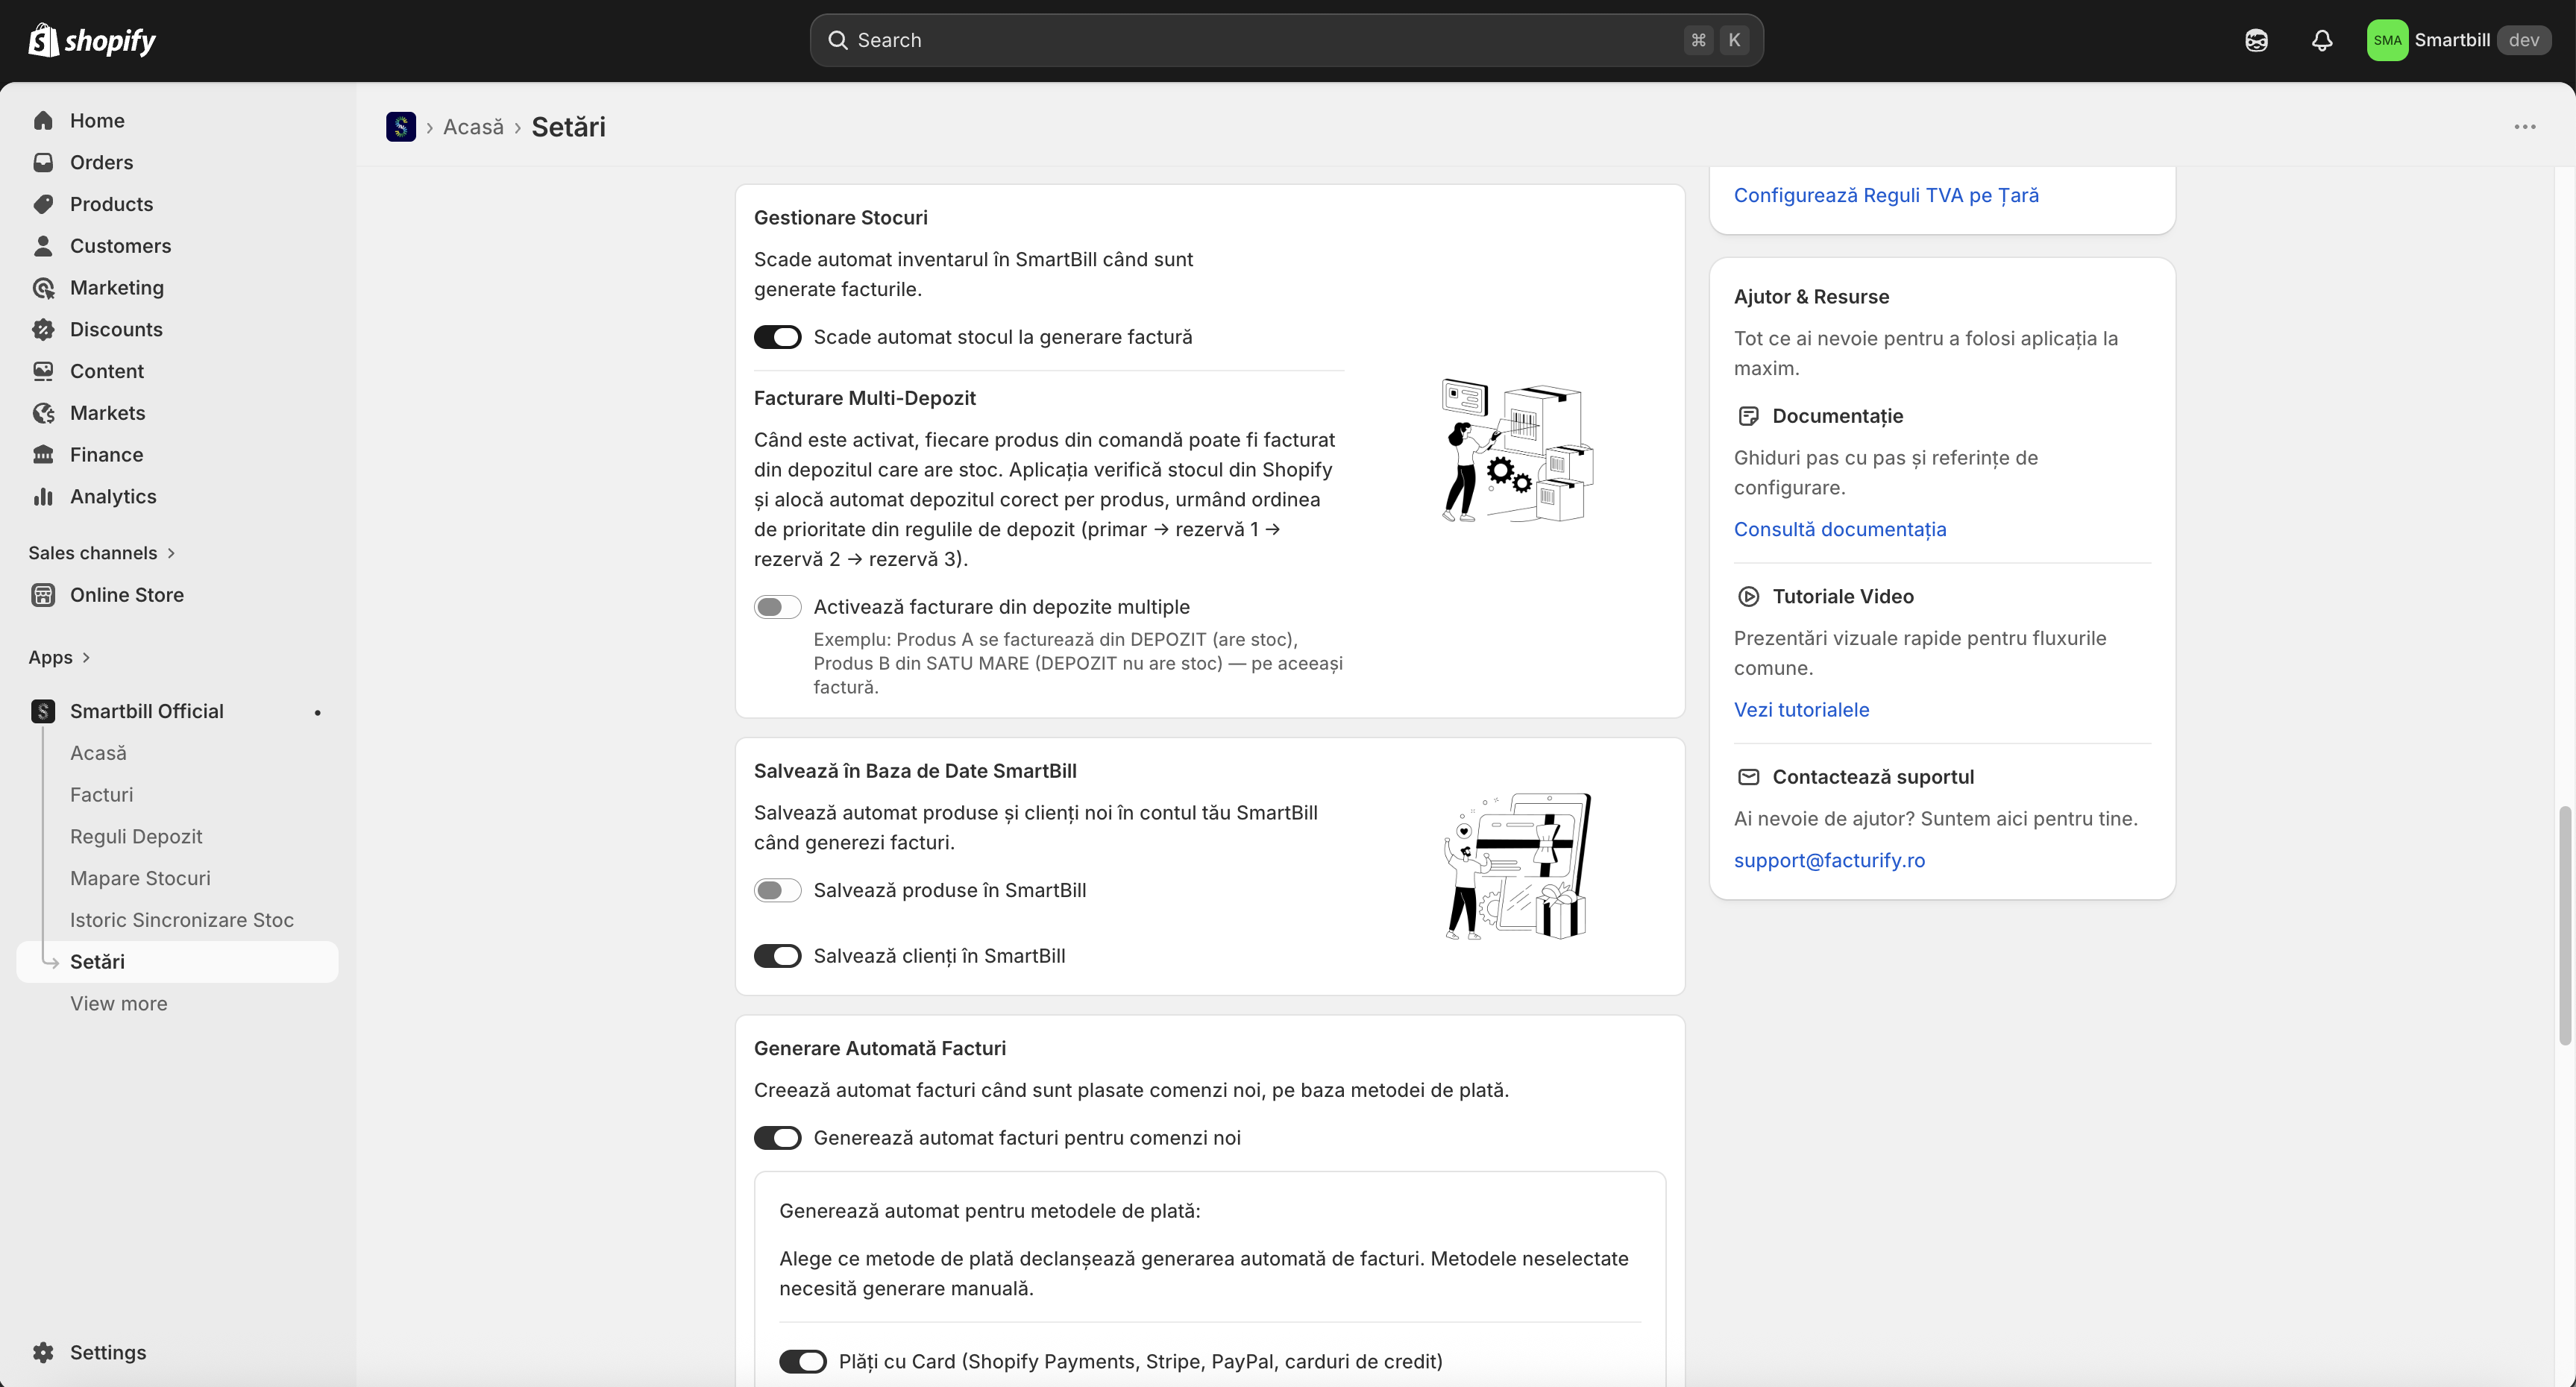
Enable stock management to automatically deduct quantities from SmartBill when invoices are generated:
Warning
Enabling this option will deduct stock from SmartBill only if you have selected a warehouse. Without a configured warehouse, products will not be deducted from stock.
Multi-Warehouse Invoicing
When enabled, each product in the order can be invoiced from the warehouse that has stock. The application checks stock in Shopify and automatically allocates the correct warehouse per product, following the priority order from the warehouse rules (primary → backup 1 → backup 2 → backup 3).
Example: Product A is invoiced from WAREHOUSE (has stock), Product B from SATU MARE (WAREHOUSE is out of stock) — on the same invoice.
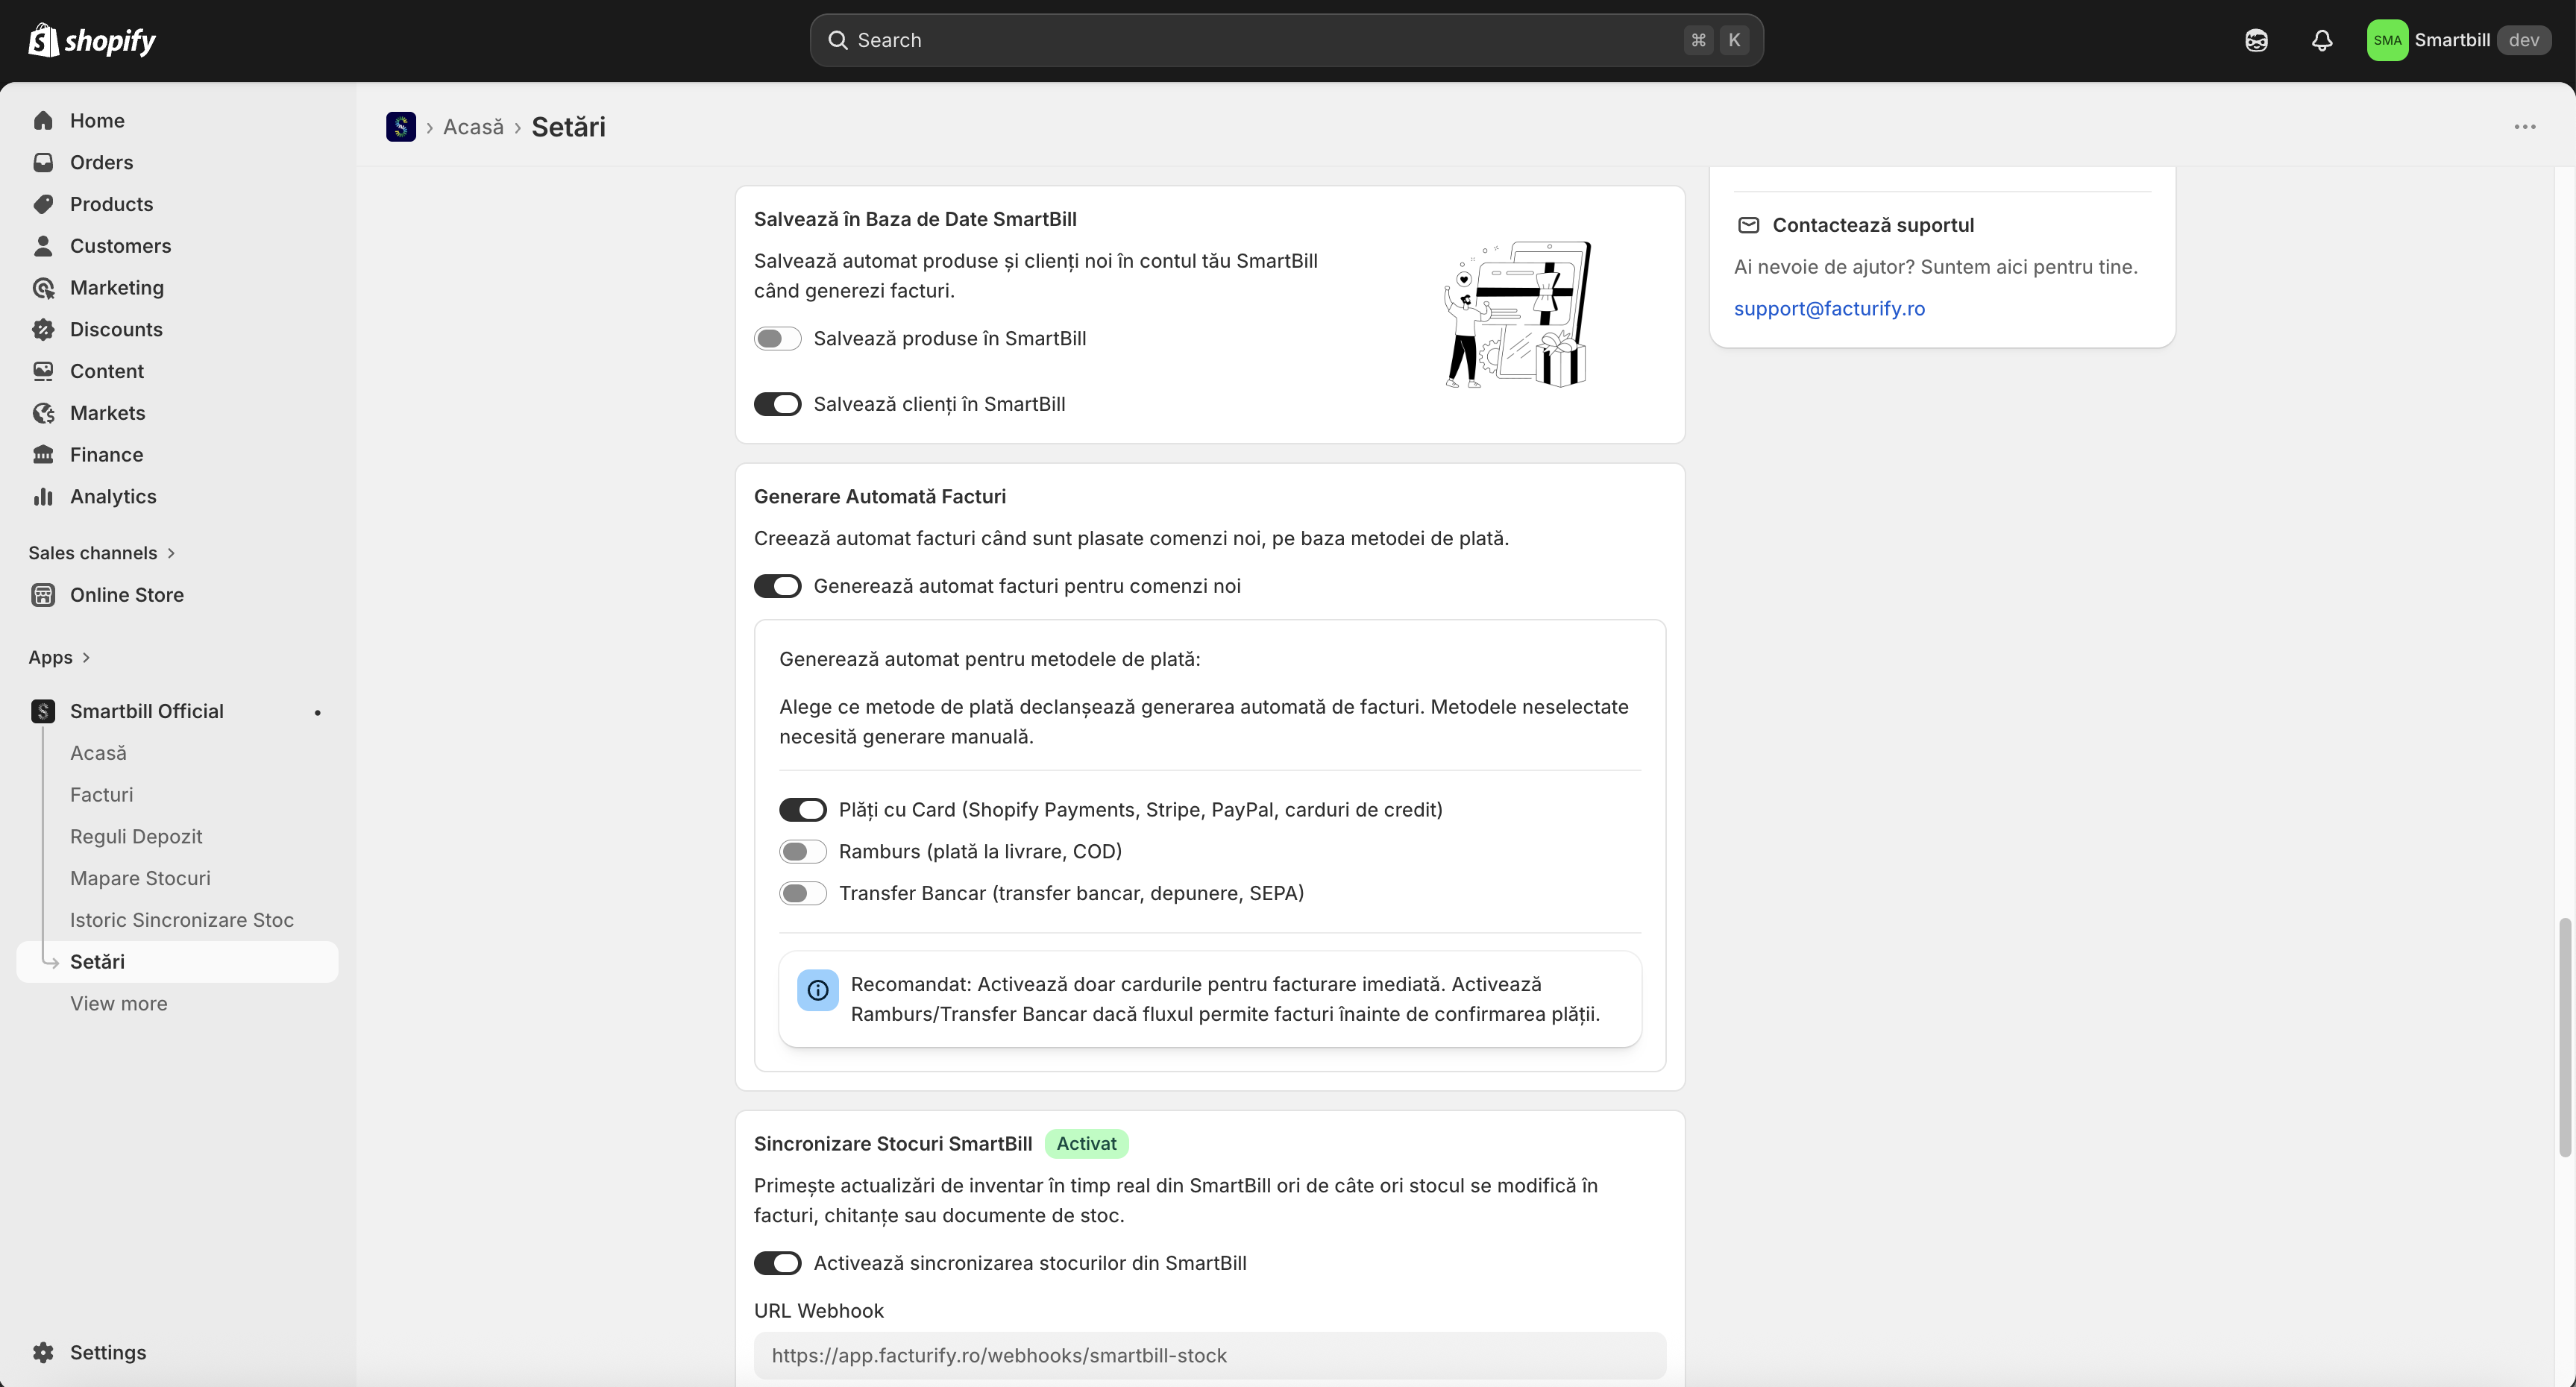
Save Products and Customers to SmartBill
Configure automatic saving of products and customers to SmartBill:
Save Products to SmartBill
If enabled, products from orders will be automatically saved to the SmartBill product database.
Recommended: NO for stores with a large catalog.
Save Customers to SmartBill
If enabled, customers from orders will be automatically saved to the SmartBill customer database.
Recommended: YES for easier management and GDPR compliance.
Benefits
Saving customers facilitates the management of subsequent invoices and compliance with tax legislation.
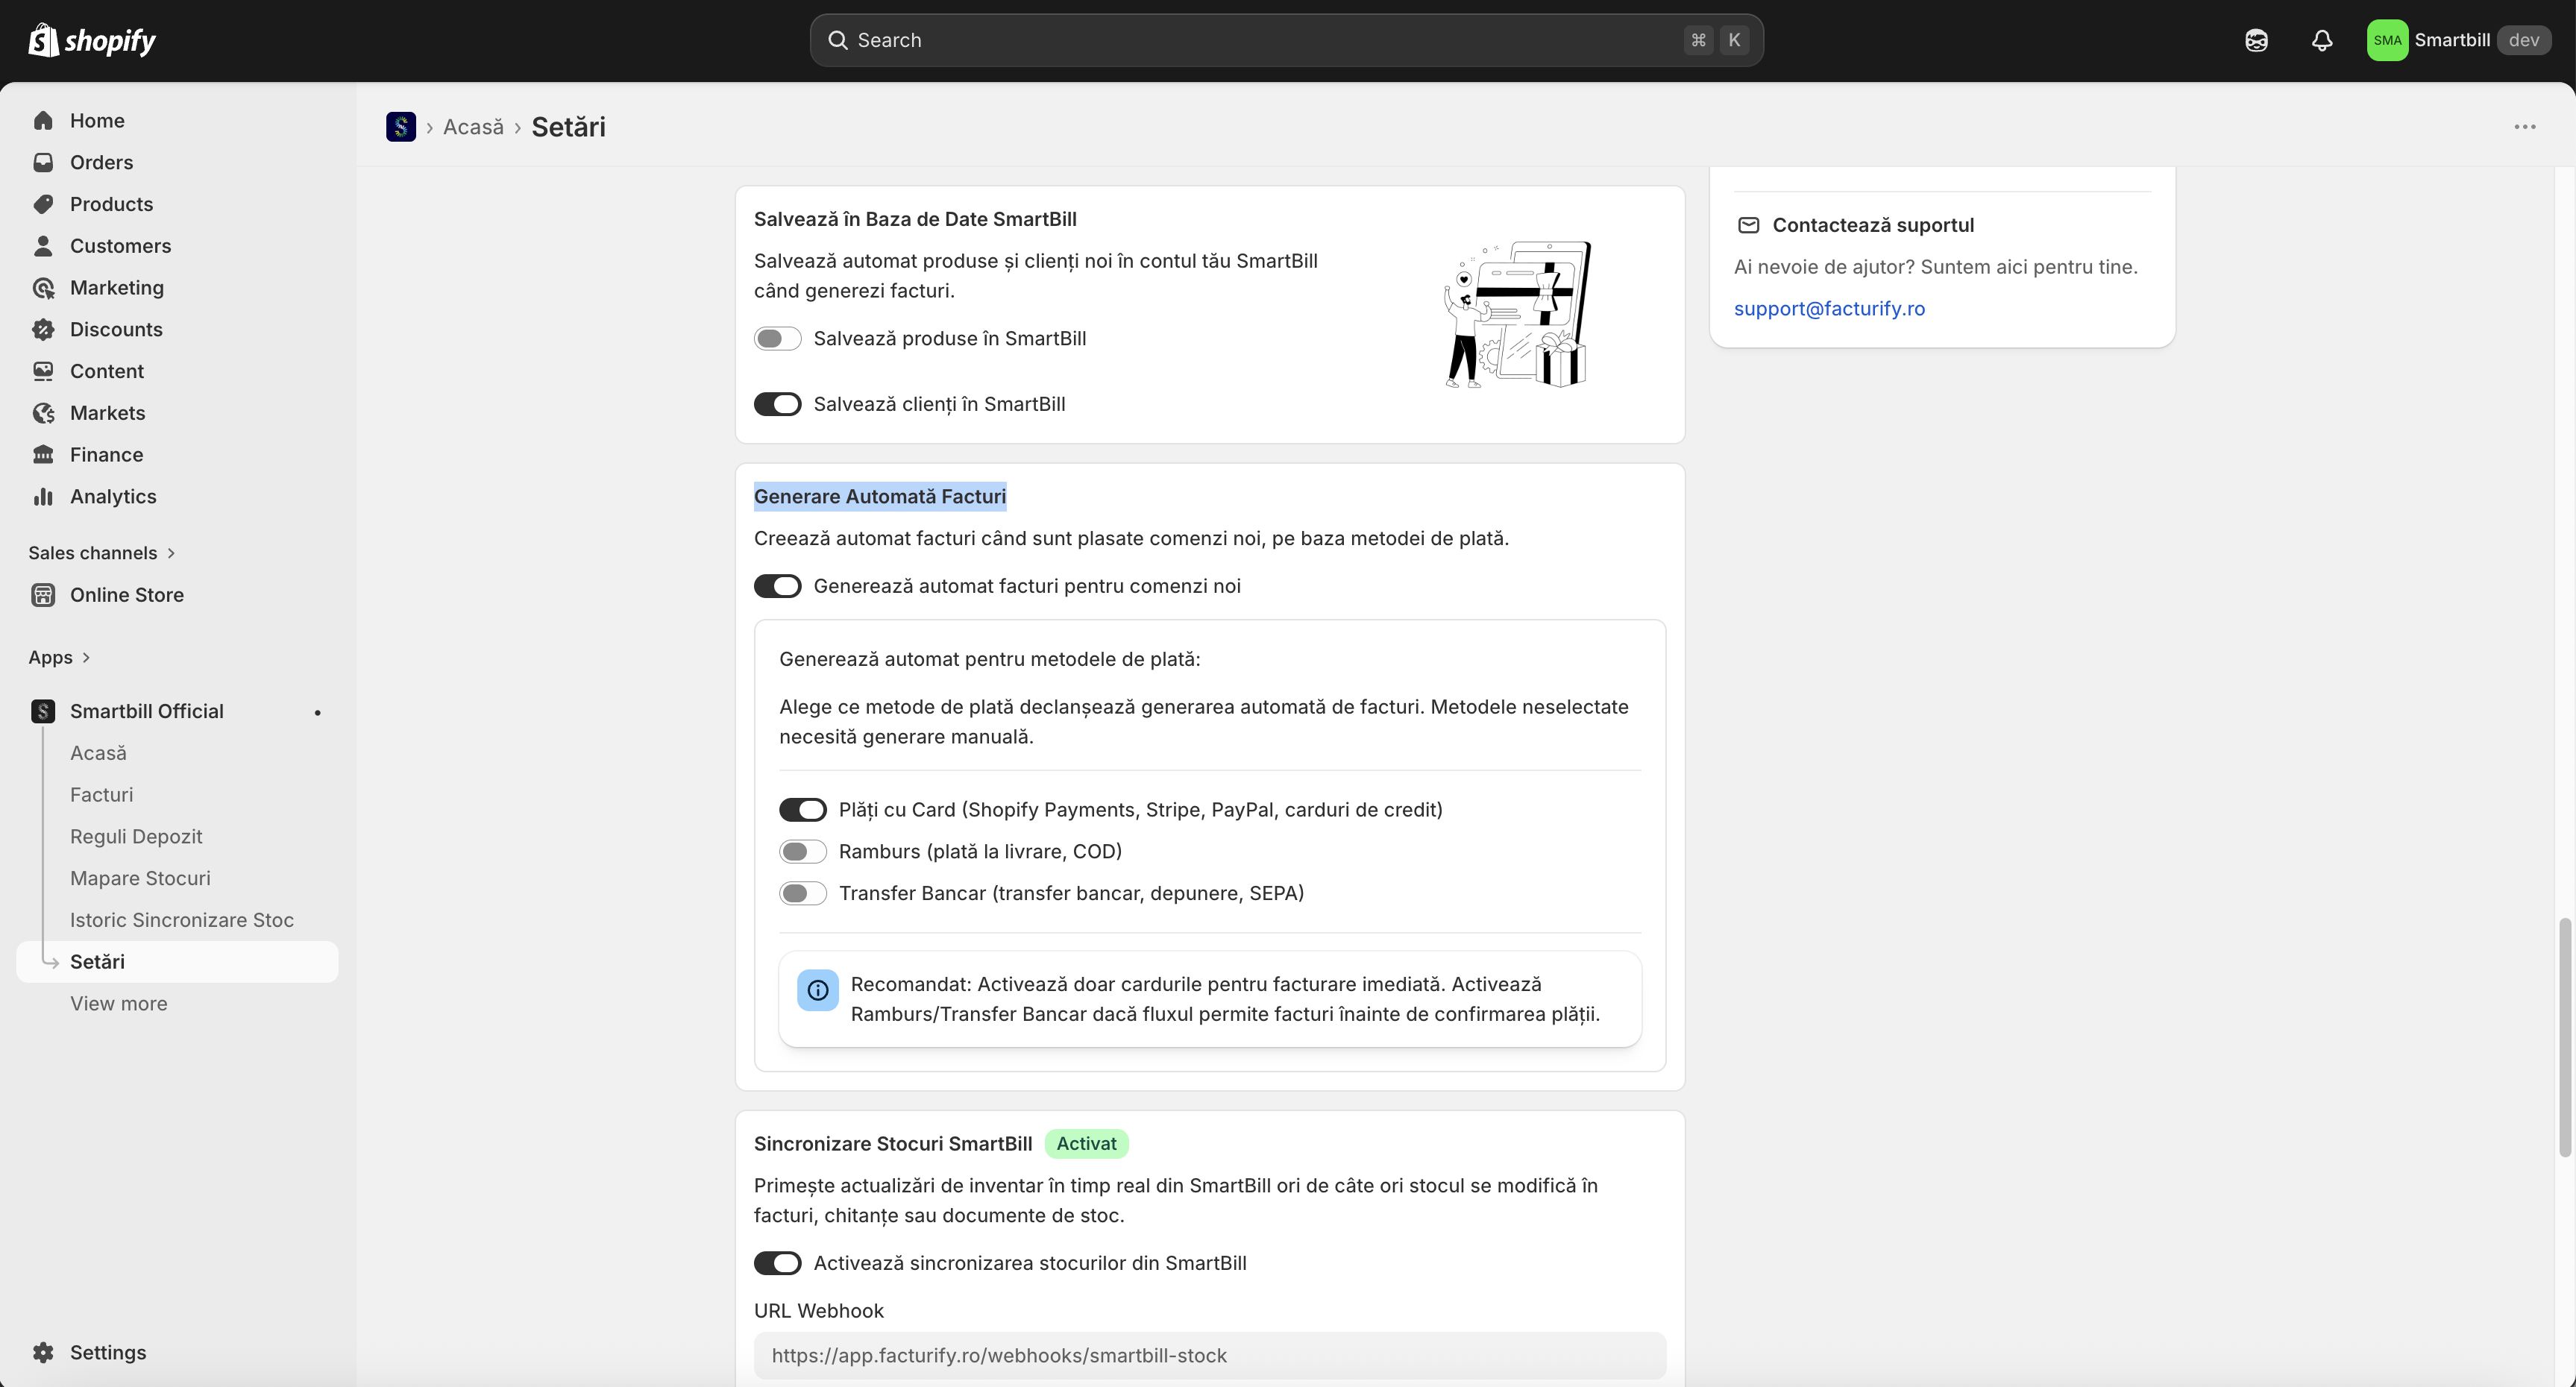
Automatic Invoice Generation
Configure automatic invoice generation upon order completion (available for Basic plans and above):
The 'Automatic Invoicing' feature requires a Basic plan or higher
To enable automatic invoicing, you must have an active plan that includes this feature. See the Subscriptions page.
Recommendation
It is recommended to enable automatic generation only for online payments (card, PayPal). For cash on delivery and bank transfer, manual generation provides more control.
VAT Regime for the EU
Select the VAT regime applied to orders from the European Union:
HOME (National Regime)
All invoices are issued with the VAT of the sender’s country (Romania).
For stores that sell primarily in Romania or are below the OSS threshold (10,000 EUR/year).
OSS (One Stop Shop)
Invoices are issued with the VAT rate of the recipient’s country (EU customer).
For stores registered in OSS, with international EU sales.
VAT rates required in SmartBill for OSS
When you enable the OSS regime, you must create a VAT rate named “OSS” in SmartBill for each VAT percentage of the countries you sell to.
For example, if you sell to Germany (19%) and France (20%), create in SmartBill:
- OSS at 19% (for Germany)
- OSS at 20% (for France)
You can find the VAT rates for each EU country in the application on the EU VAT Rates page in the menu. Only add the rates in SmartBill for the countries where you have sales.
Intra-Community CIF for OSS
The intra-community CIF is required only if you are registered under the OSS regime. If you use the HOME regime, this setting is not necessary.
Important
The VAT OSS feature requires the Professional plan or higher. See the VAT and Regimes page for details.
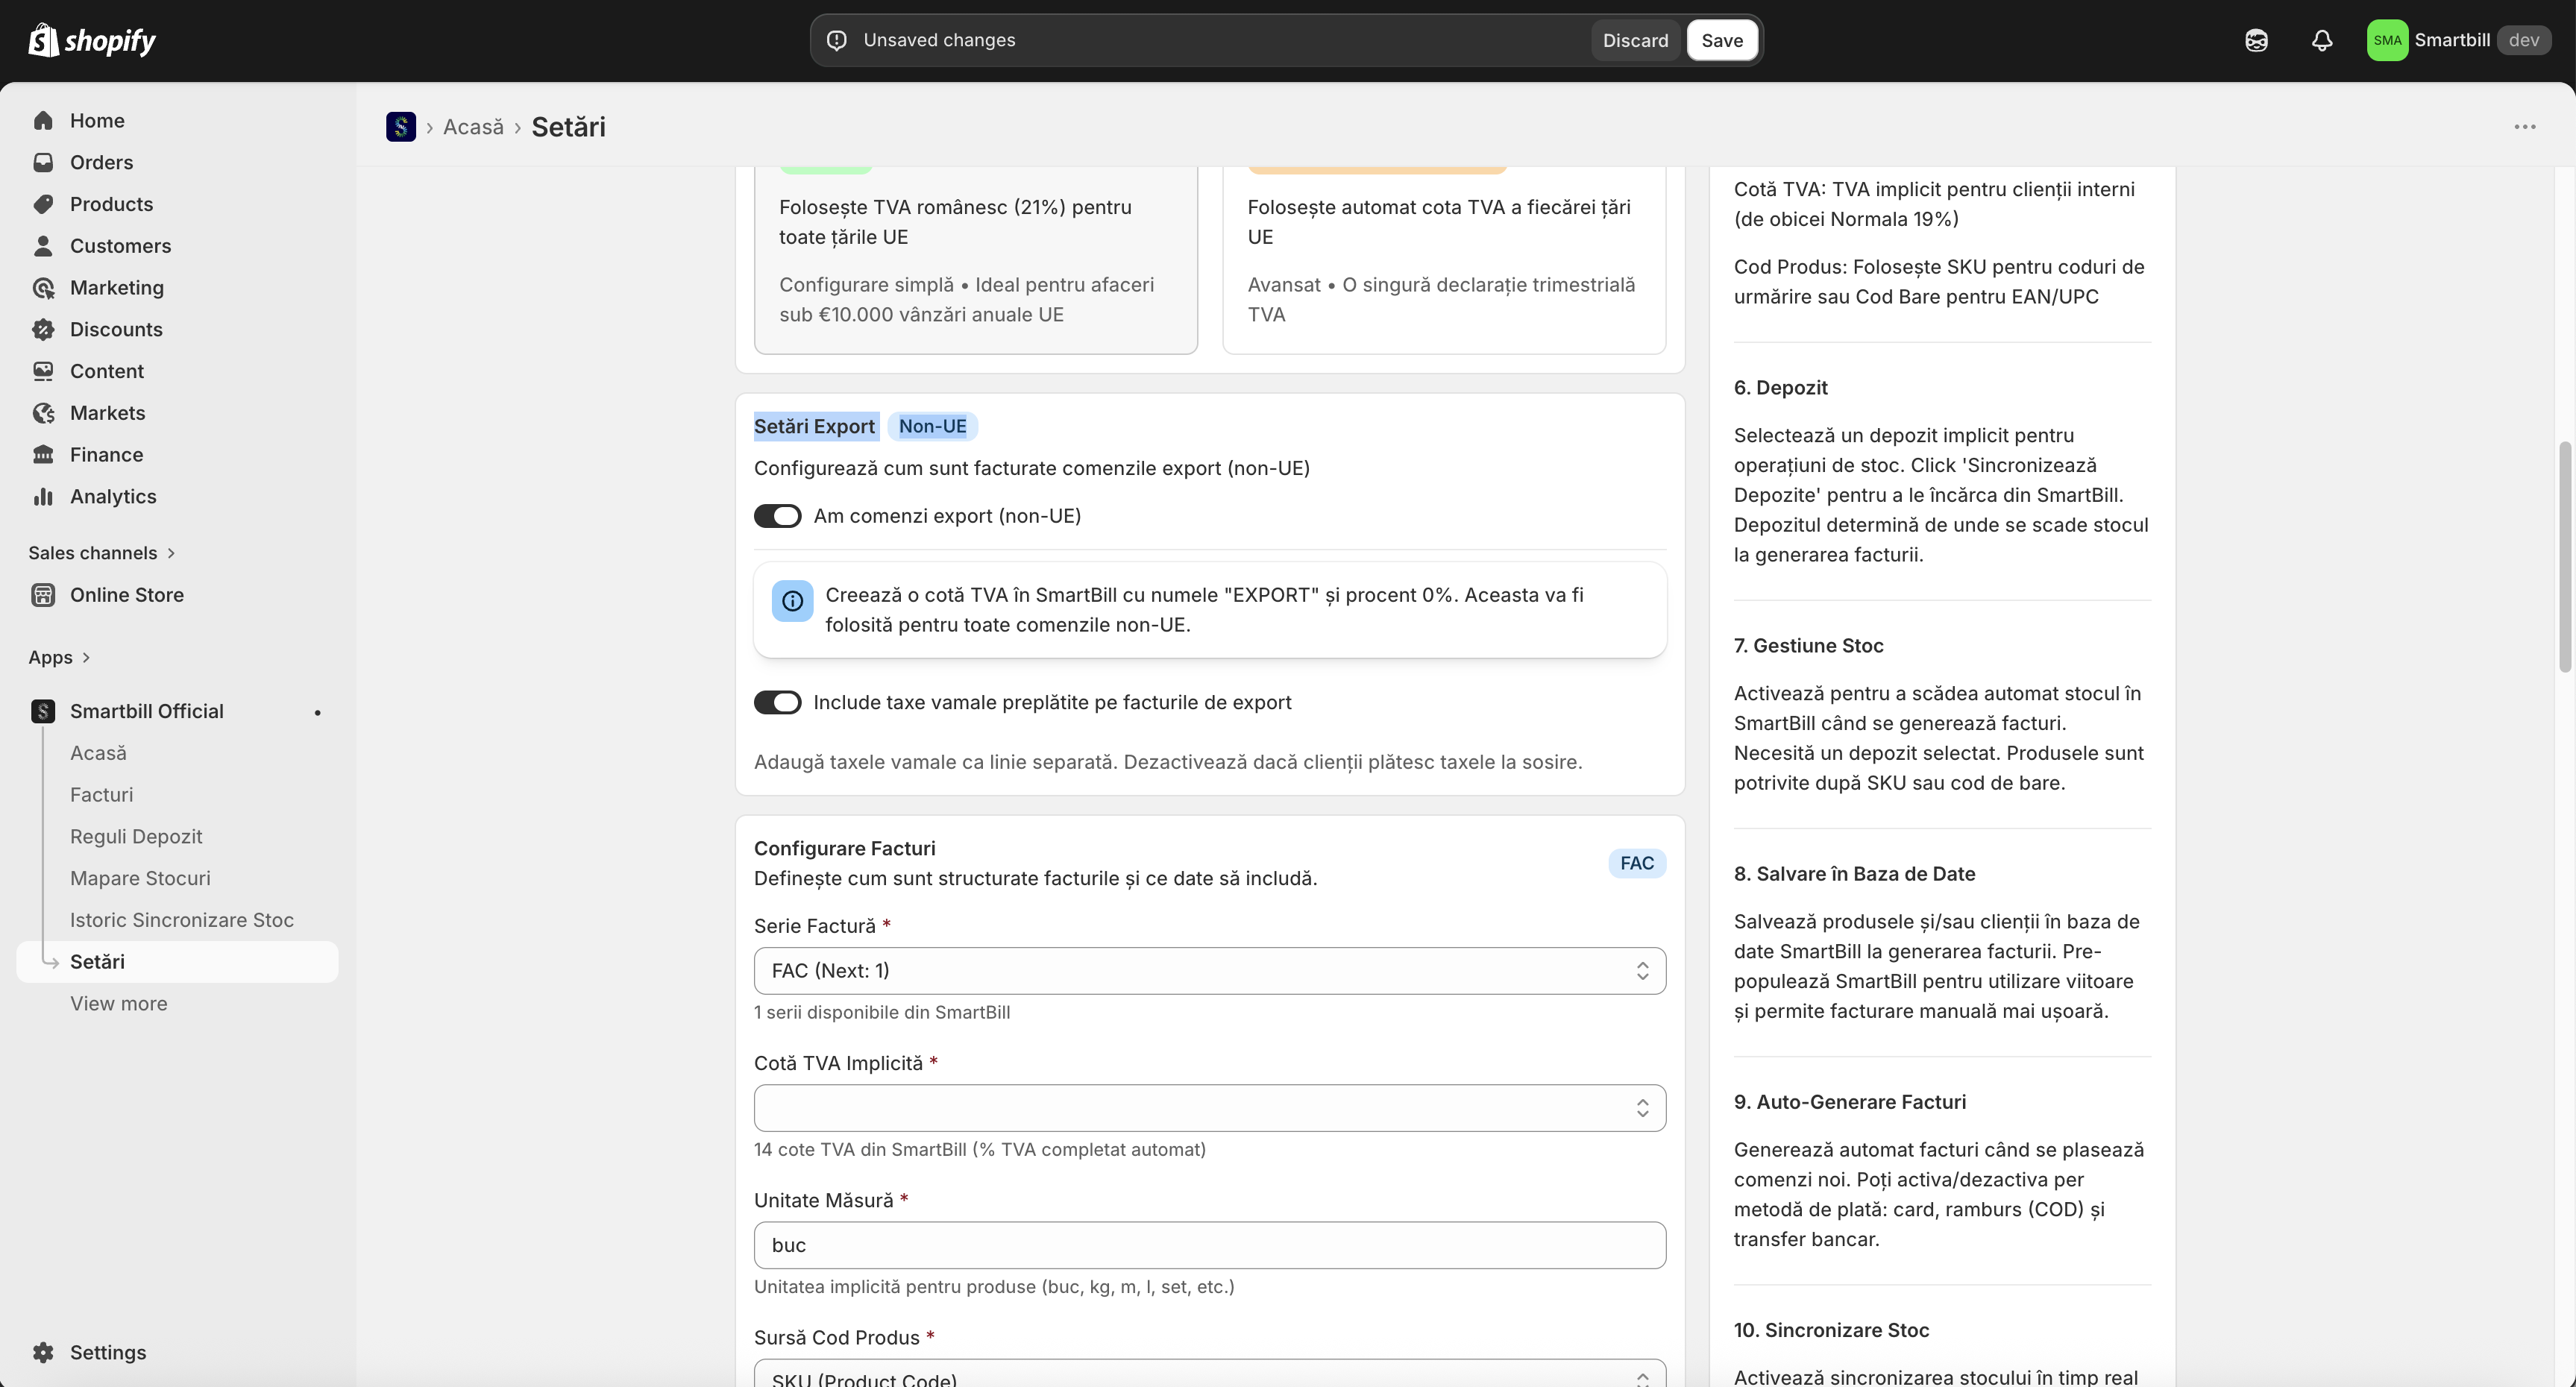
Export Settings (Non-EU)
Configure the parameters for orders to countries outside the European Union:
I have export orders (non-EU)
Enable this option if you also sell to countries outside the EU (USA, UK, Switzerland, etc.).
Required configuration in SmartBill
You must create a VAT rate named “EXPORT” with a 0% value in SmartBill.
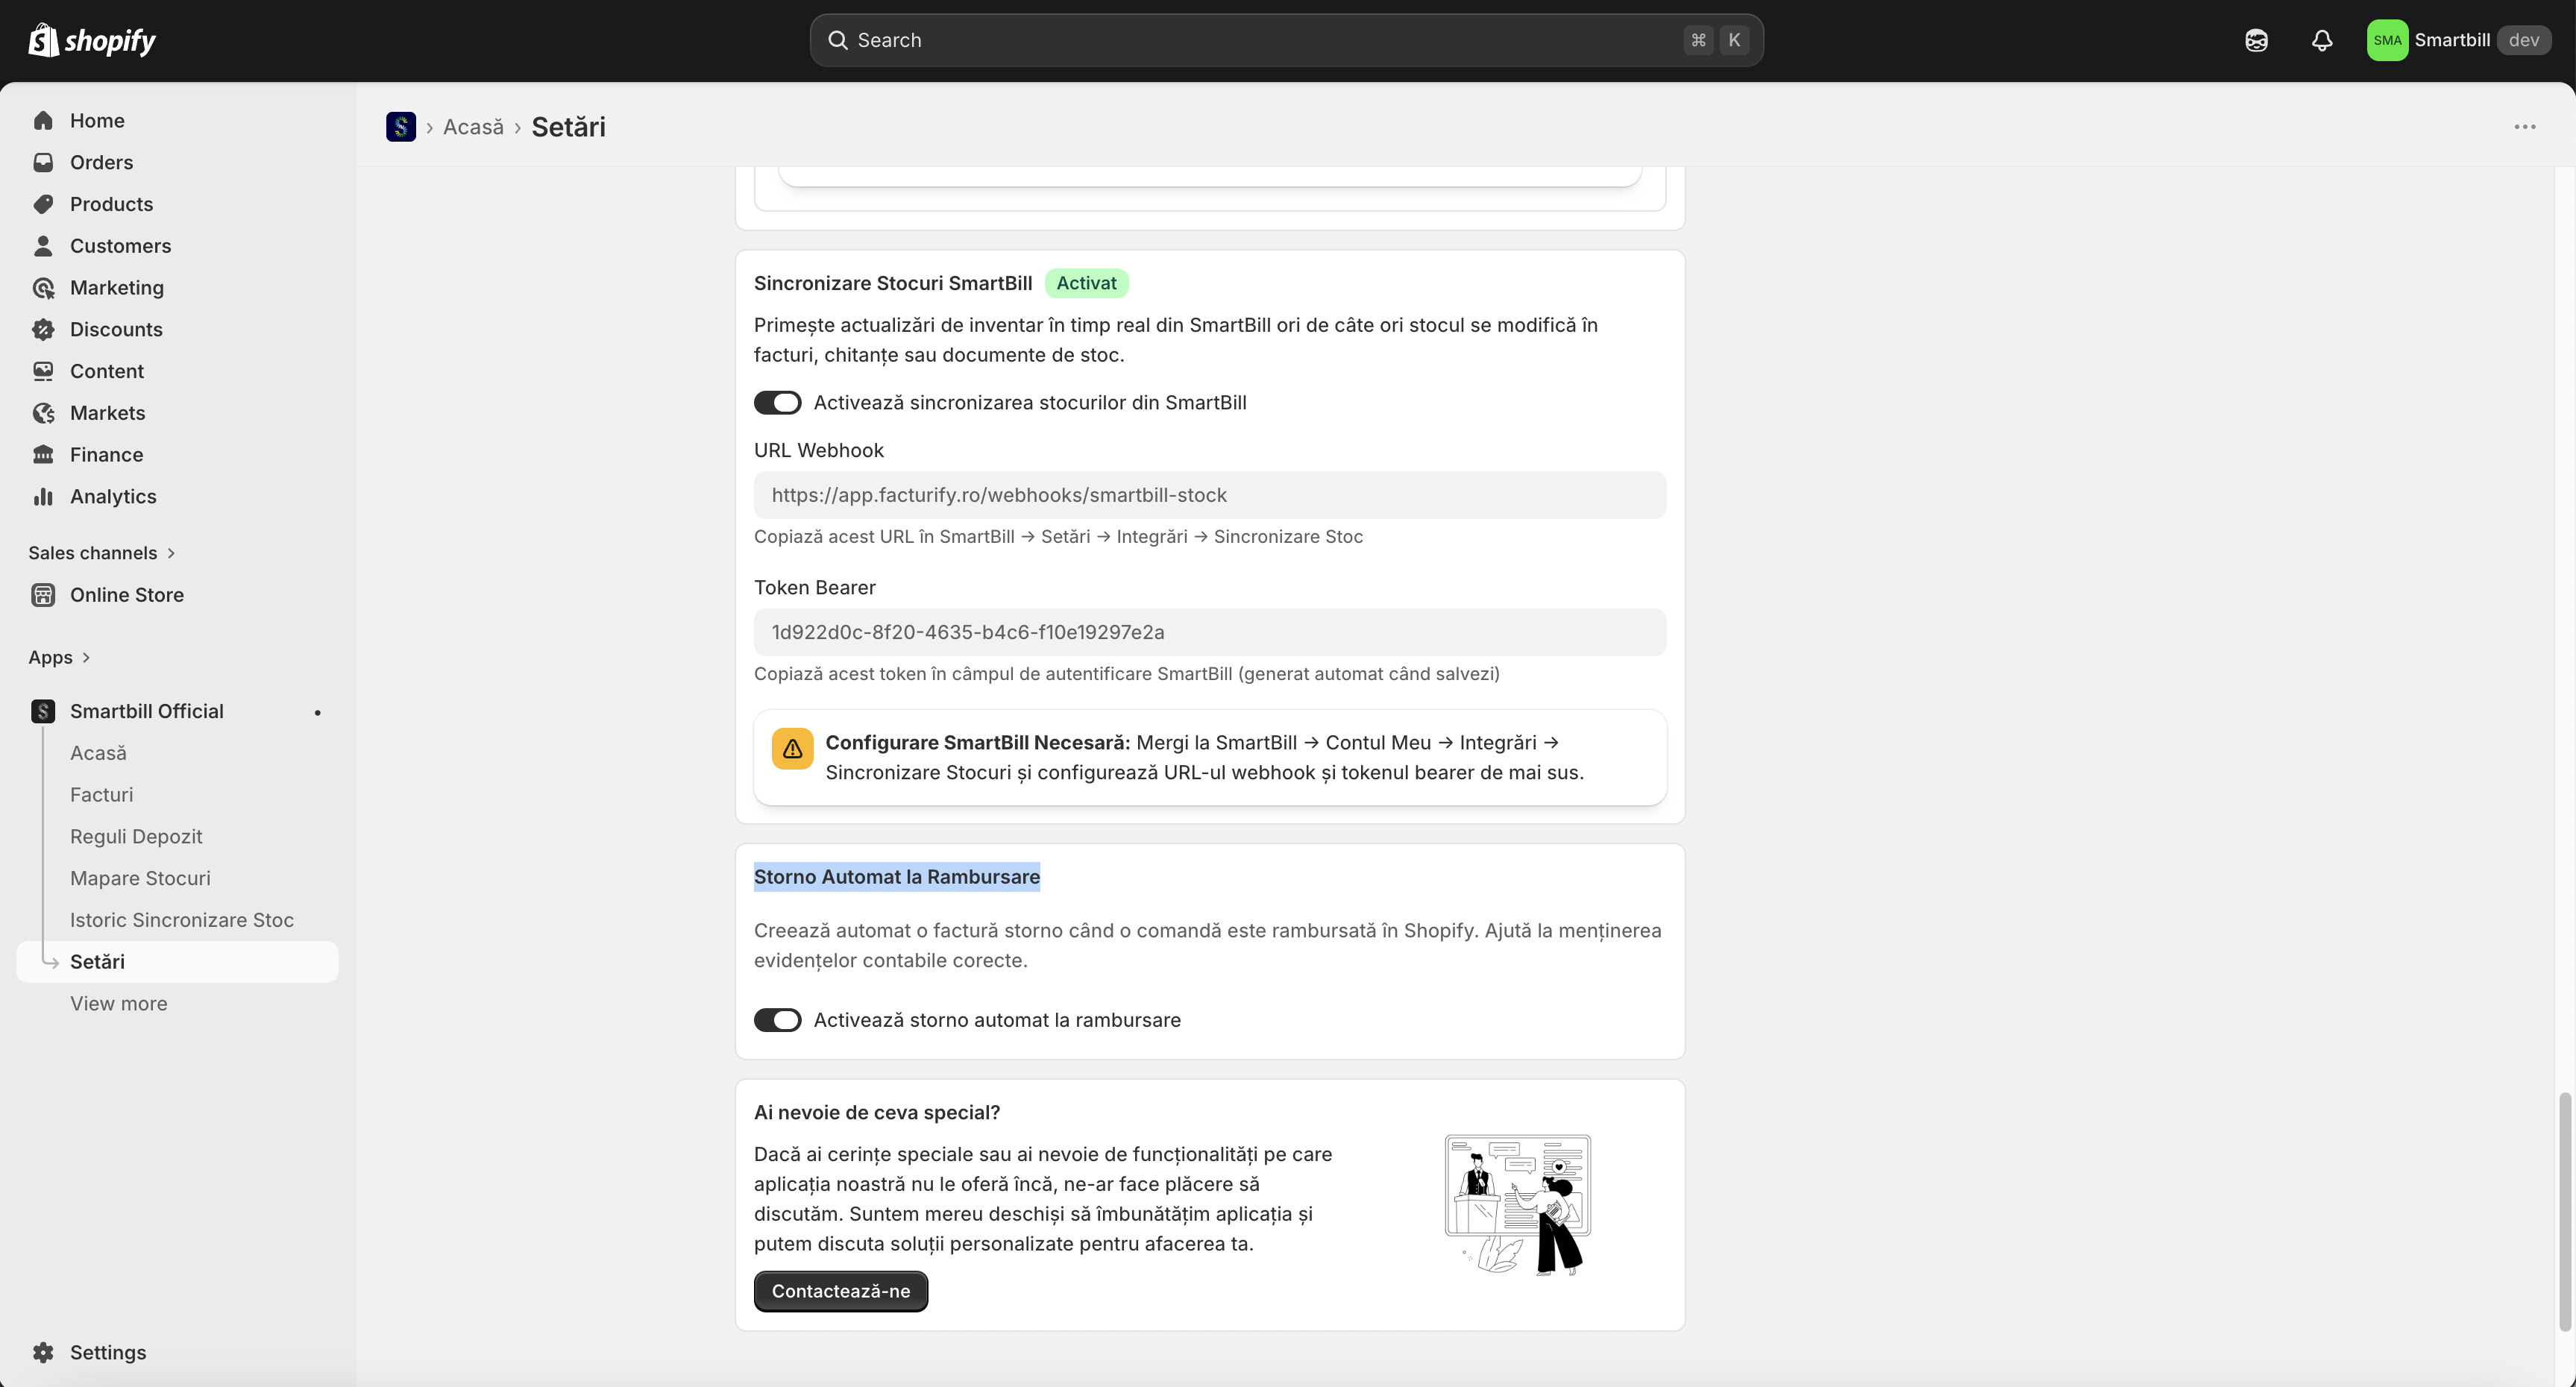
Stock Synchronization SmartBill → Shopify
Enable automatic stock synchronization from SmartBill to Shopify (available for Basic plans and above):
How does it work?
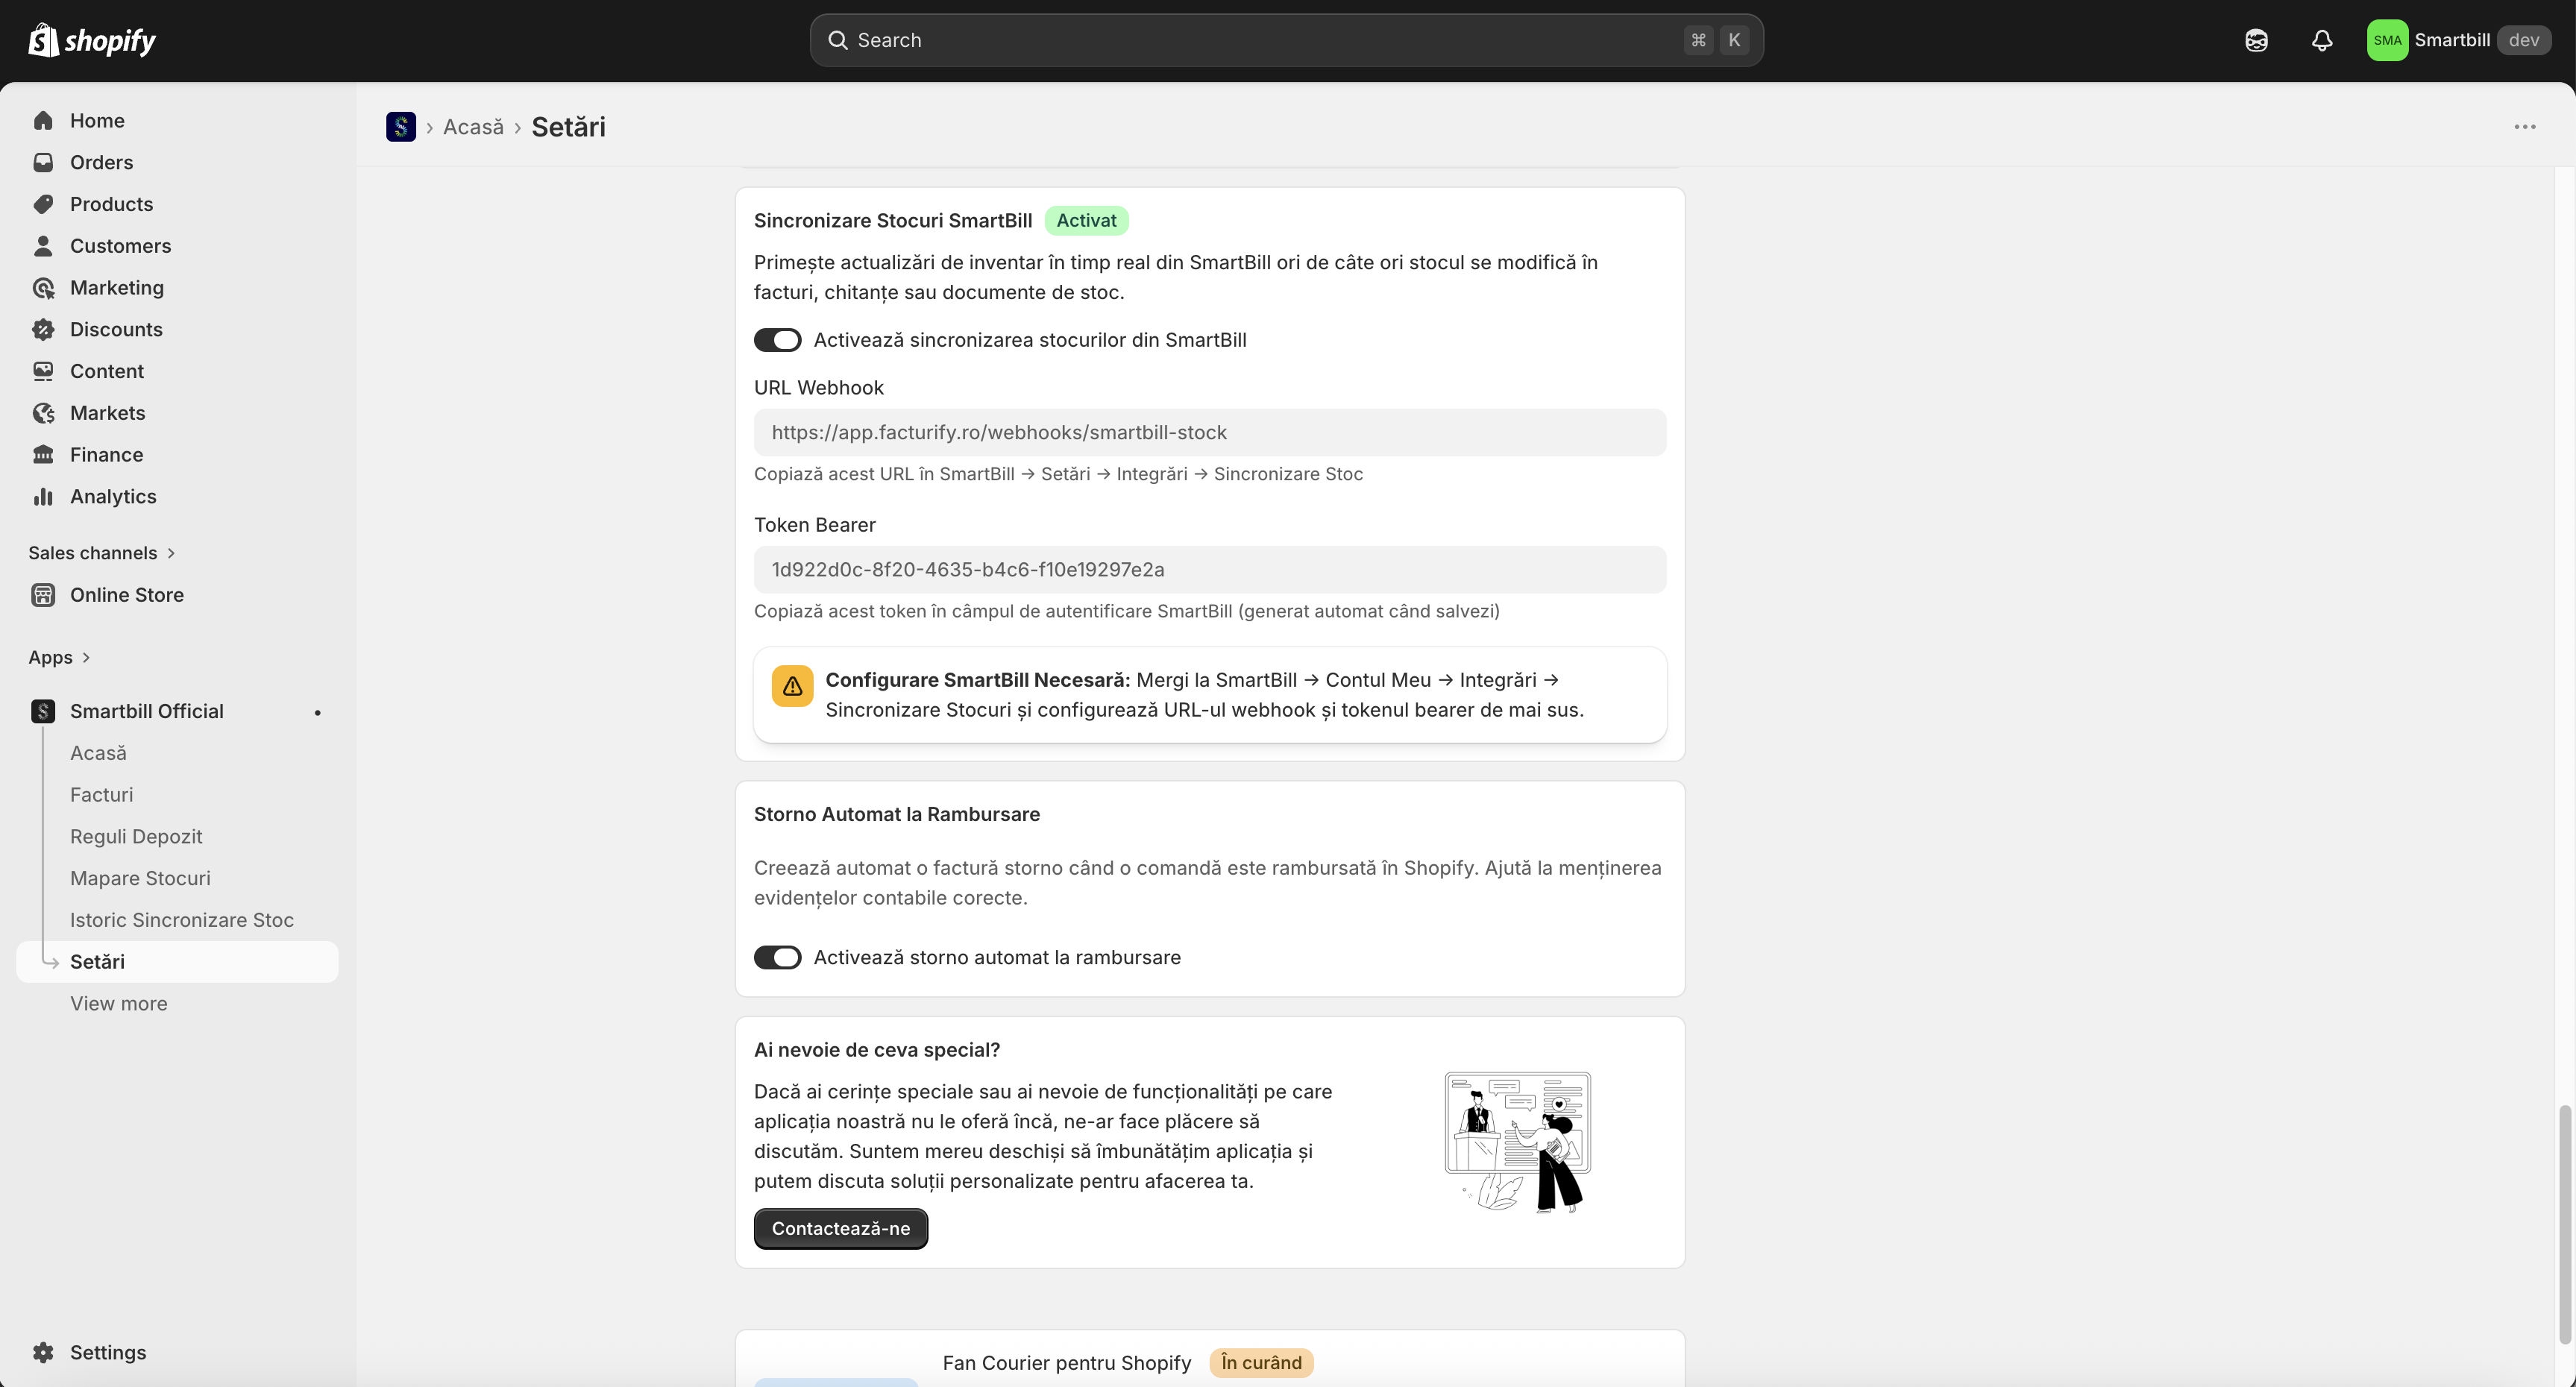
Every time stock changes in SmartBill (outgoing, incoming, transfer), the application receives a notification and automatically updates the stock levels in Shopify.
Activation steps:
- Go to Settings in the Facturify app for Shopify
- Enable the “Stock Synchronization” toggle
- Copy the automatically generated URL and Authentication Token
- Go to SmartBill.ro → Integrari → Sincronizare Stocuri
- Paste the URL and Token in the corresponding fields
- Click “Testeaza conexiunea” to verify the configuration
- Click “Salveaza” in SmartBill
Benefits
Stock levels are updated in real time, preventing overselling. Full details on the Stock Synchronization page.
Automatic Reversal on Refund
Enable automatic invoice reversal when orders are refunded in Shopify (available for Professional plans and above):
How it works
When you create a refund for an order in Shopify, the application automatically detects this event and creates a reversal in SmartBill for the associated invoice.
Note
This feature is available only for Professional and Enterprise plans. Check the Subscriptions page.