SmartBill Invoice Generation
Complete guide for generating and managing SmartBill invoices from Shopify. Learn how to generate invoices manually or automatically, manage reversals, and register payments.
Before generating invoices
Make sure you have correctly configured: the SmartBill connection, invoice series, VAT rate, and default warehouse. Without these settings, invoice generation will fail. See Initial Configuration.
Manual Invoice Generation
There are three ways to manually generate SmartBill invoices for orders:
1. From the Order Details Page
Required Step: Add the SmartBill Block
After installing the application, the “SmartBill Invoices” block does not appear automatically on the order page. It must be added manually once and pinned to remain permanently visible.
- Open an order from Orders in Shopify Admin
- On the right side of the page, click “Add block” (or the ”+” icon)
- Select “SmartBill Invoices” from the list of available blocks
- Click the “Pin” icon on the block to fix it permanently on all orders

Steps to generate from the order page:
- Go to Order Details — In Shopify Admin, navigate to Orders and select the desired order
- Find the SmartBill Section — On the right side of the page you will see the “SmartBill Invoices” block (added in the previous step)
- Select the Warehouse — Choose the warehouse to invoice from (if you have multiple warehouses configured)
- Generate the Invoice — Click the “Generate Invoice” button and wait for confirmation
Real Time
After generation, the invoice number and series appear immediately in the SmartBill block, along with buttons for printing, PDF download, reversal, cancellation, and deletion.
Generation Errors
If invoice generation fails, the error will be displayed directly in the SmartBill block. The last error remains visible until a successful generation. Examples of common errors:
- Insufficient stock — The product does not have enough stock in the selected SmartBill warehouse
- Warehouse not found — The configured warehouse does not exist in SmartBill. Check the warehouse settings
- Series not found — The configured invoice series no longer exists in SmartBill
- VAT rate not found — The configured VAT rate does not match the SmartBill nomenclature
You can retry generation directly from the SmartBill block by clicking the “Generate Invoice” button. For detailed error solutions, see the Troubleshooting page.
2. From the Orders Page
Steps:
- In Shopify Admin, navigate to Orders
- Select one or more orders from the list (check the checkboxes)
- Click the actions button (three vertical dots) and select “Generate SmartBill Invoice”
- In the window that opens, verify the order details
- Click “Generate Invoice”
- After generation, you will see the invoice series and number + PDF download button
3. From the SmartBill App → Invoices
Steps:
- Open the SmartBill app from Shopify Admin
- Navigate to the Invoices page
- You will see a list of all orders and their invoicing status
- For orders without an invoice, click the “Generate” button
- The invoice is generated instantly and the series-number appears in the table
Invoices Page
From this page you can filter orders by payment/delivery status, search for orders, and see all generated invoices in one place. However, the recommended method is generating directly from the SmartBill block on the order page.
Automatic Invoice Generation
Automatic generation allows invoices to be created upon order completion, without manual intervention (available for Basic plans and above):
Requires Basic Plan or Higher
The auto-invoicing feature requires an active subscription. See the Subscriptions page for details.
How Does It Work?
1. New Order in Shopify
When a customer places an order in your store, the application is automatically notified.
Everything happens automatically in the background — you don’t need to do anything.
2. Payment Method Verification
The application checks how the customer paid (card, cash on delivery, bank transfer) and compares it with your settings.
The invoice is generated automatically only for the payment methods you have enabled in settings.
3. Invoice Appears in SmartBill
Within seconds, the invoice is automatically created in SmartBill and appears on the order page in the SmartBill block.
For online payments (card, PayPal), the payment is automatically registered in SmartBill along with the invoice.
Supported Payment Methods
You can selectively enable automatic generation for:
Card / Online Payments (recommended)
Shopify Payments, PayPal, Stripe, Braintree, etc.
Advantage: Payment is confirmed instantly → invoice is generated immediately
Payment collection is registered automatically: For online payments, the application automatically registers the invoice payment collection in SmartBill when the invoice is generated
Cash on Delivery
Cash payment upon delivery.
Warning: Invoice is generated before payment collection → risk of order cancellations
Recommended: Use manual generation for cash on delivery orders
Bank Transfer
Payment via bank wire (manual).
Disadvantage: Payment may be delayed by days → invoice generated before payment collection
Recommended: Use manual generation after payment confirmation
Configure in Settings
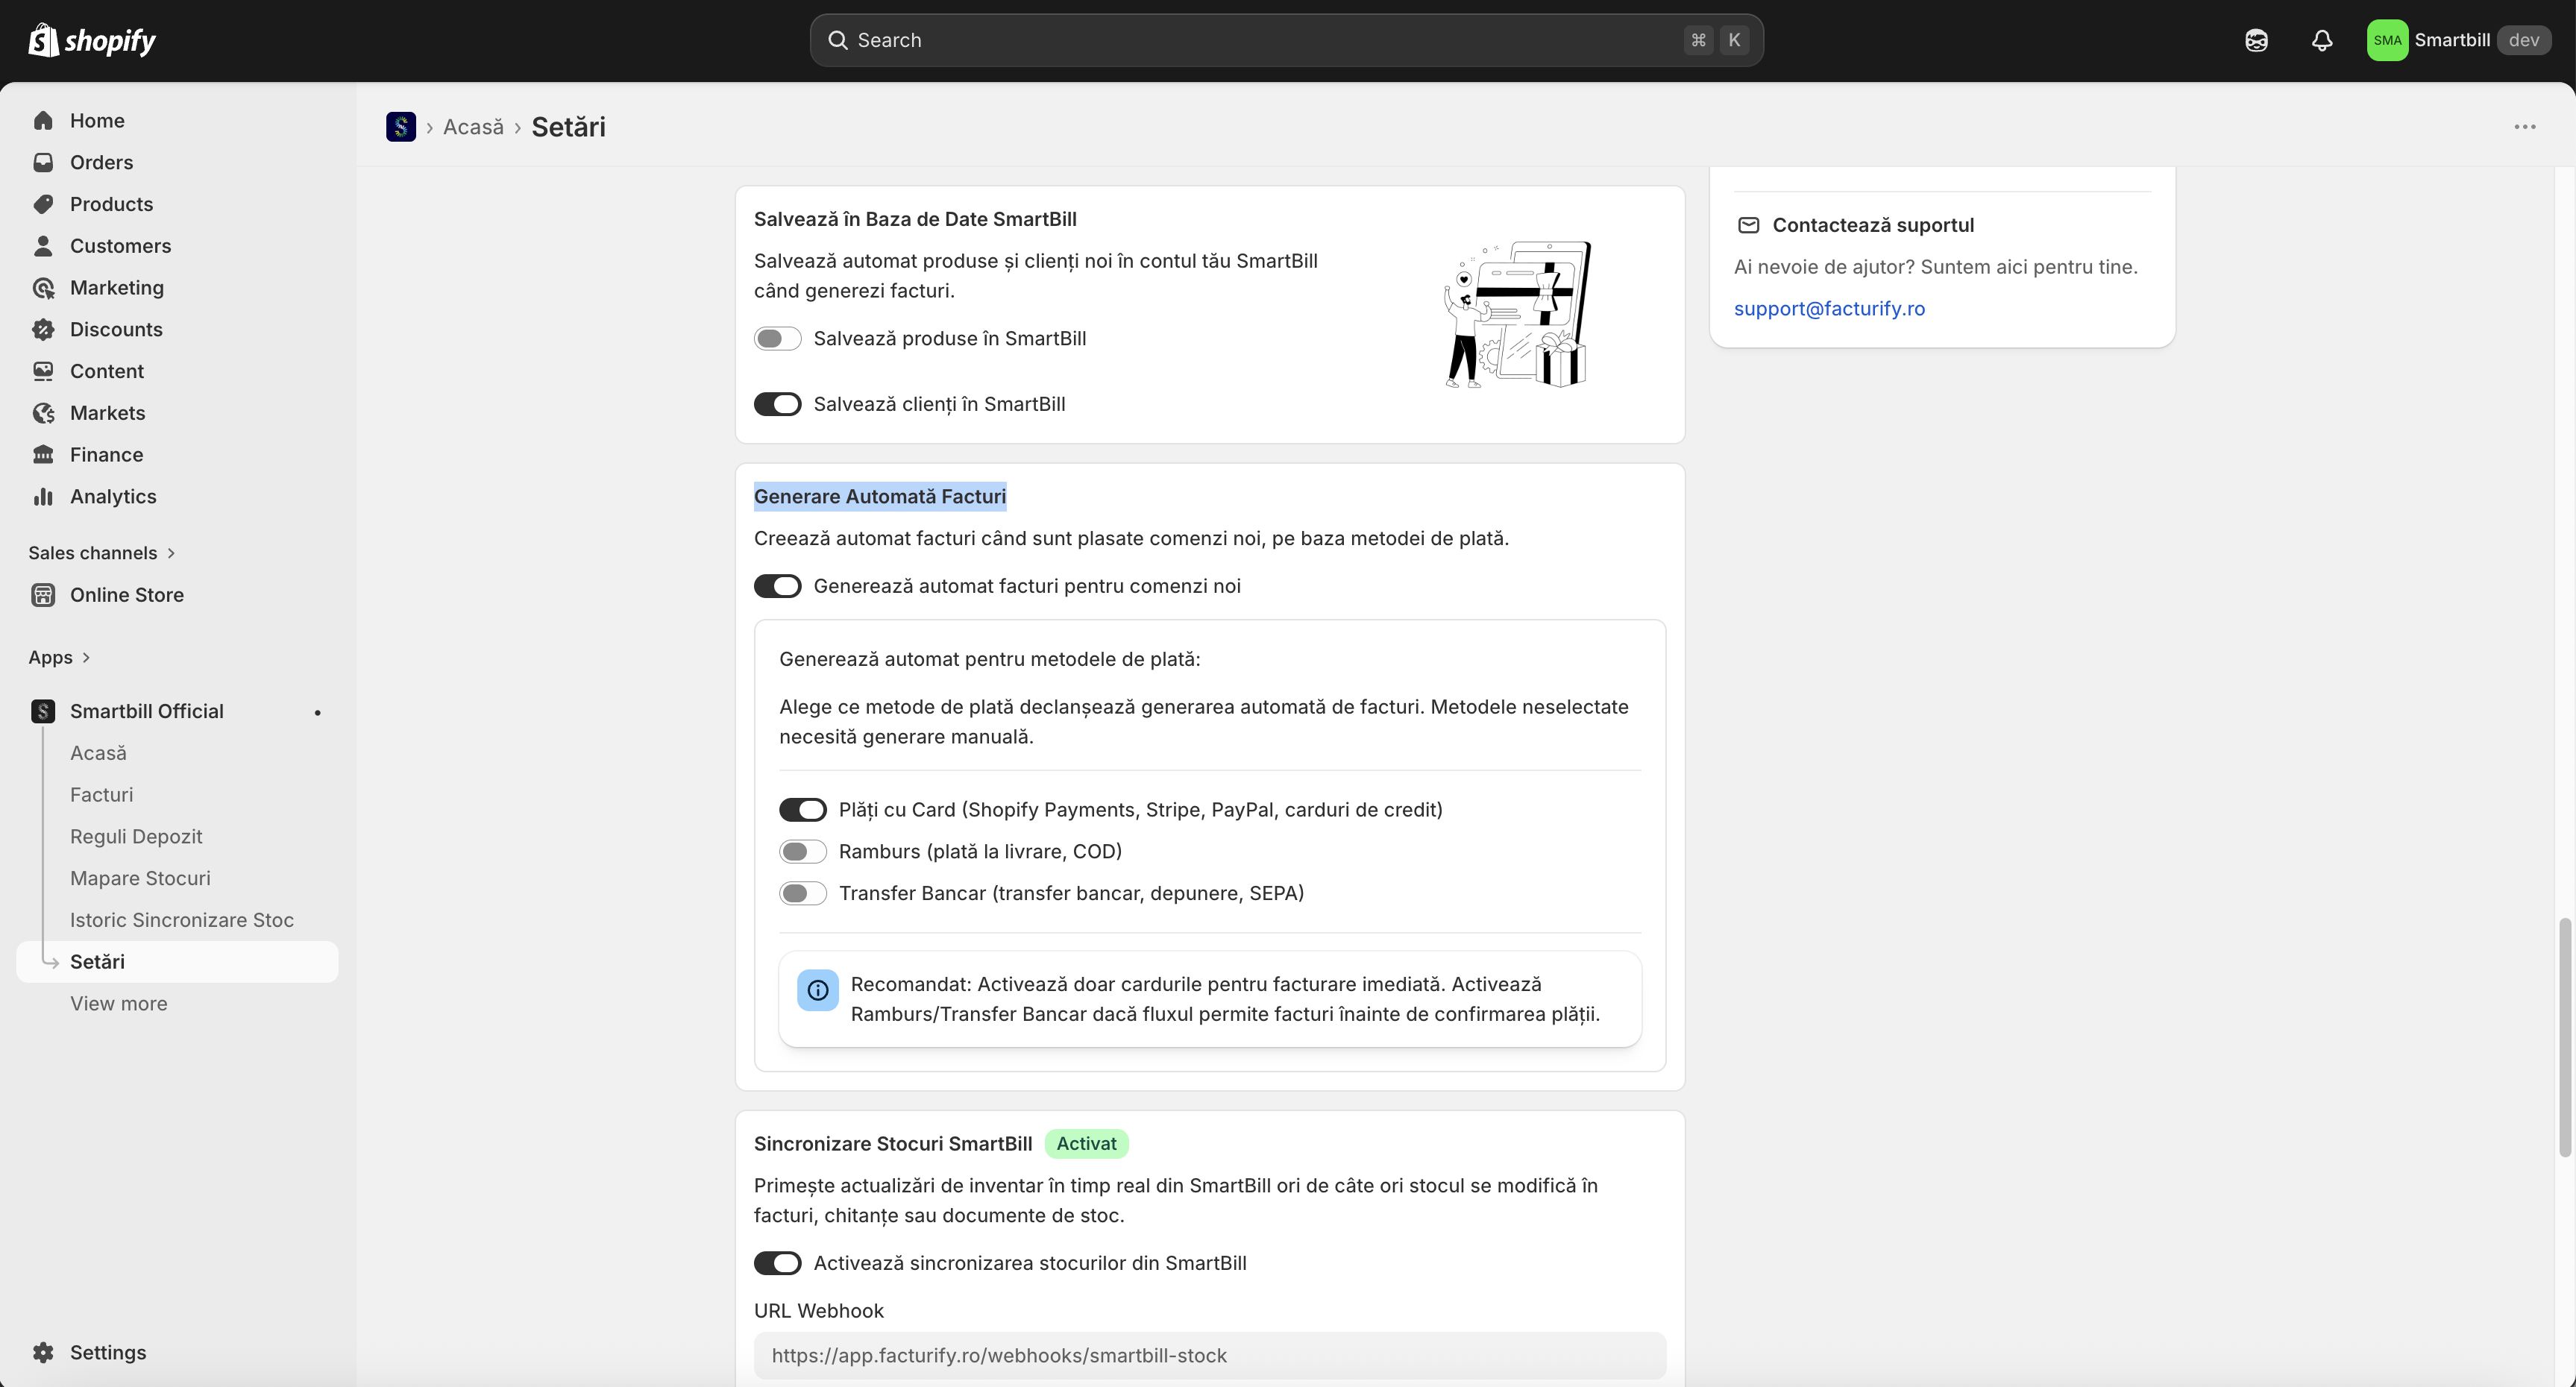
To enable or disable automatic generation, go to Settings → Automatic Invoice Generation. From there you can enable the “Automatically generate invoices for new orders” option and select the desired payment methods: Card Payments, Cash on Delivery (COD), or Bank Transfer.
Bulk Generation
Generate invoices for multiple orders at once, directly from the Shopify orders list. Useful when you have multiple orders to invoice simultaneously.
Available from the Basic plan
Bulk generation is available starting with the Basic plan. It saves considerable time for high order volumes.
Steps:
- In Shopify Admin, navigate to Orders
- Select one or more orders from the list (check the checkboxes)
- Click the actions button (three vertical dots) and select “Generate SmartBill Invoice”
- In the window that opens, verify the details of the selected orders
- Click “Generate Invoice”
- After generation, you will see the series and number of each invoice + PDF download button
Note
Orders that already have a generated invoice are automatically skipped. If an invoice fails (e.g., insufficient stock), the remaining orders continue to be processed normally.
Invoice Reversal
Reversal is the correct method, compliant with tax legislation, for canceling an issued invoice:
What is a Reversal?
Reversal
Reversal is a tax document that cancels a previously issued invoice, having the exact same value but with a negative sign.
Example: Invoice FACT-100 with value 500 RON → Reversal FACT-101 with value -500 RON → Net total: 0 RON
When should you use Reversal?
- The order was returned by the customer — Customer refunds products → reversal to cancel VAT
- The order was canceled after the invoice was issued — The invoice was sent to the customer → you cannot delete it
- You need to issue a corrected invoice — Reverse the incorrect invoice → generate a new correct invoice
How to Generate a Reversal?
Steps:
- Go to the order in Shopify Admin
- In the “SmartBill Invoices” block on the right, you will see the generated invoice
- Click the “Return” icon (curved arrow) next to the invoice
- Confirm the action
- The application automatically creates a reversal in SmartBill and displays it below the original invoice
After Reversal
The original invoice will be marked as “Reversed”, and the reversal will appear as a separate document with its own series-number. You can generate a new corrected invoice after the reversal.
Automatic Reversal on Return
The application can automatically generate a reversal when an order is returned in Shopify (available for Professional plans and above):
How to enable:
- Go to Settings → Auto-Storno on Cancel
- Enable the “Enable Auto-Storno” toggle
- Save the settings
Warning!
Automatic reversal works through the “refunds/create” webhook. Make sure the order cancellation process is well managed to avoid accidental reversals.
Cancel Invoice
Cancellation marks an invoice as canceled in SmartBill, but does NOT create a reversal document:
Difference from Reversal
Reversal (Recommended)
Creates a new tax document (reversal) with a negative value. Reported to ANAF (invoice + reversal). Compliant with Romanian tax legislation.
Use for official returns/cancellations
Cancel (Disabled)
Marks the invoice as canceled in SmartBill. Does NOT create a new tax document. Keeps the invoice in the system, but inactive.
Use only for minor internal errors
When NOT to use Cancel
- For official returns (use Reversal)
- For cancellations after sending the invoice to the customer (use Reversal)
- For tax compliance (use Reversal)
How to Cancel an Invoice?
Steps:
- Go to the order in Shopify Admin
- In the “SmartBill Invoices” block, find the invoice
- Click the “X” icon (cancel) next to the invoice
- Confirm the action
- The invoice will be marked as “Cancelled” in the system
Delete Invoice
Deletion completely removes the invoice from SmartBill, but has strict restrictions:
Important Restrictions!
- You can only delete the LAST invoice in the series (per SmartBill rules)
- The invoice must not have been sent to the customer
- Deletion is PERMANENT — it cannot be undone
When Can You Delete?
- Invoice generated by mistake — Immediately after generation, before sending to the customer
- Testing configurations — Test invoices generated to verify settings
- It is the last document in the series — Verify that no invoices have been issued after this one
How to Delete an Invoice?
Steps:
- Go to the order in Shopify Admin
- In the “SmartBill Invoices” block, find the invoice
- Click the “Delete” icon (red trash can) next to the invoice
- Verify it is the last in the series (if not, the button will be disabled)
- Confirm the action
- The invoice is permanently deleted from SmartBill
After deletion
You can generate a new invoice for the same order. The new invoice will have the same series number if it was the last in the series.
Delete Reversal
You can also delete reversal documents (if they are the last in the series):
What happens:
- The reversal is deleted from SmartBill
- The original invoice returns to “Generated” (active) status
- You can generate a new reversal or leave the invoice active
- You can generate a new invoice if the original invoice was also reversed
Download Invoice from the Orders Page
Download the invoice PDF directly from the order page in Shopify Admin:
Steps:
- Go to the order in Shopify Admin
- In the “SmartBill Invoices” block on the right side of the page
- Click the “Download” icon (downward arrow) next to the invoice
- The PDF opens in a new tab
Advantage
The PDF opens instantly, without leaving the order page. Ideal for quick verification.
Invoice History
The application keeps a complete history of all operations performed on invoices:
Where to find the invoice history?
Invoice information is automatically saved and accessible in multiple places:
On the order page in Shopify
You will see the invoice number, generation date, and PDF download button directly on the order.
In the SmartBill app
The Invoices list displays all orders and the complete history: generated invoices, reversals, cancellations.
Share link
Each invoice has a unique link that you can share with customers or your accountant.
Timeline / Order Chronology
In the SmartBill app, the order details page displays a complete timeline of operations:
Example events in the timeline:
- Invoice Generated: FACT-100 generated (manual/automatic)
- Invoice Reversed: FACT-100 reversed → reversal FACT-101 created
- Invoice Deleted: FACT-100 deleted from the system
- Invoice Cancelled: FACT-100 cancelled (without reversal)
- Payment Registered: Payment of 500 RON registered via Card
- Webhook Processed: Auto-reversal created by refund webhook
Auto-Detection
The timeline automatically detects operations and displays them with colored badges: green (success), red (error), yellow (warning), blue (info).
All operations are tracked
The application saves a complete history of all actions performed: generations, reversals, cancellations, modifications. You can check at any time what happened with an invoice.
Payment Collection
The application automatically synchronizes payments from Shopify to SmartBill, eliminating the need for manual registration:
1. Automatic Payment Collection (card payments)
For online payments (card, PayPal), the payment is automatically registered in SmartBill at the same time as the invoice is generated:
Maximum Efficiency
The application creates the invoice AND registers the payment in a single step. Result: invoice instantly marked as “COLLECTED” in SmartBill.
When does it apply?
Card payments (Shopify Payments, Stripe, Braintree), PayPal, or any payment method that confirms payment instantly.
The system automatically detects the payment method and registers the payment if the order is paid.
What information is sent?
Payment type: “Card online” (automatically detected from Shopify). Amount: Order total (including taxes, shipping). Currency: Customer’s currency. Date: Invoice generation date.
2. Deferred Payment Collection (cash on delivery, bank transfer)
For payment methods that do NOT confirm instantly (cash on delivery, bank transfer), the payment collection is registered automatically when the order becomes paid:
Automatic flow:
- The order is manually marked as paid in Shopify Admin
- The application automatically detects the status change
- Checks if an invoice has been generated for the order
- If an invoice exists and is not already collected, the payment collection is registered in SmartBill
- The invoice is marked as COLLECTED in SmartBill
Duplicate Prevention
The system first checks if the payment collection has already been registered (for example, during invoice generation). If the collection already exists, it is not registered again.
3. Payment Method Mapping
Payment methods from Shopify are automatically detected and mapped to SmartBill types:
Automatic mapping:
- Shopify Payments, Stripe, Braintree → Card online
- PayPal → Card online
- Cash on Delivery → Cash
- Bank Transfer → Payment Order (OP)
- Manual payment → Payment Order (OP)
- Other → Card online (default)
Common Issues
Solutions for the most common issues when generating invoices:
SmartBill is not configured
Cause: SmartBill credentials are not configured or the account has not been connected.
Solution: If this is the first installation, complete the Setup Wizard. If the application was already configured, go to Settings → API Configuration and enter the Email, Token, and company CIF.
Monthly Limit Reached
Cause: You have reached the monthly invoice limit for the current plan.
Solution: Upgrade to a higher plan or wait for the beginning of the next month. See the Subscriptions page.
VAT regime mismatch (Configuration mismatch detected)
Cause: The application is configured on HOME, but the EU order contains VAT rates that are not Romanian (e.g., 20% Germany). This means Shopify has OSS configured, but the application does not.
Solution: Check Settings → EU VAT Compliance and choose: HOME (for sales only in Romania) or OSS (for sales across the EU). See VAT and Regimes.
Insufficient stock in the SmartBill warehouse
Cause: SmartBill does not have enough stock for the product in the selected warehouse. The original SmartBill message indicates the exact product and warehouse.
Solution:
- Add stock through a Goods Receipt Note (NIR) in SmartBill
- OR disable “Use SmartBill Stock” in Settings if you don’t manage stock
- If you have multi-warehouse, verify that stock exists in the correct warehouse
Invoice generated but PDF is not showing
Cause: The PDF has not yet been generated in SmartBill (delay of ~5 seconds).
Solution: Wait 10 seconds and refresh the page. If the issue persists, check in SmartBill.ro if the invoice exists.
Invoice has incorrect VAT
Cause: Incorrectly configured VAT rate or wrong VAT regime (HOME vs OSS).
Solution:
- Delete the invoice (if it is the last in the series) or create a reversal
- Correct the VAT rate in Settings → Invoice Configuration
- Check the VAT Regime (HOME/OSS) in Settings → EU VAT Compliance
- Regenerate the invoice
Payment collection is not registered automatically
Cause: Payment method is not recognized or payment detection is not working.
Solution:
- Card payments (Shopify Payments, Stripe, PayPal) are collected automatically upon invoice generation
- For Cash on Delivery (COD) and Bank Transfer, the payment collection is registered when the order is marked as paid in Shopify
- Contact support if the payment method is not recognized
Product not found in SmartBill
Cause: The product does not exist in the SmartBill nomenclature and the “Save products to SmartBill” option is disabled.
Solution:
- Enable “Save products to SmartBill” in Settings
- OR manually add the product in SmartBill.ro → Nomenclator
- Regenerate the invoice
Automatic generation is not working
Cause: The feature requires a plan with automatic generation enabled, or the payment method is not checked.
Solution:
- Check the active plan in Settings → Subscription
- Verify that “Automatically generate invoices for new orders” is enabled in Settings → Automatic Invoice Generation
- Verify that the payment method from the order is checked: Card Payments, Cash on Delivery, or Bank Transfer
Invoice series not found in SmartBill
Cause: The series configured in the application does not exist in the SmartBill account.
Solution: Open SmartBill → Setari → Serii documente and verify that the series exists. Then go to Settings in the application and select a valid series from the dropdown.
Warehouse not found in SmartBill
Cause: The selected warehouse does not exist in SmartBill or the name does not match exactly.
Solution: Go to Settings → Warehouses and resynchronize the warehouses from SmartBill. Select a valid warehouse from the updated list.
If the issue persists
See the Troubleshooting page for a complete problem-solving guide or contact technical support.